Crochet Drawstring Makeup Bag for Everyday Organization
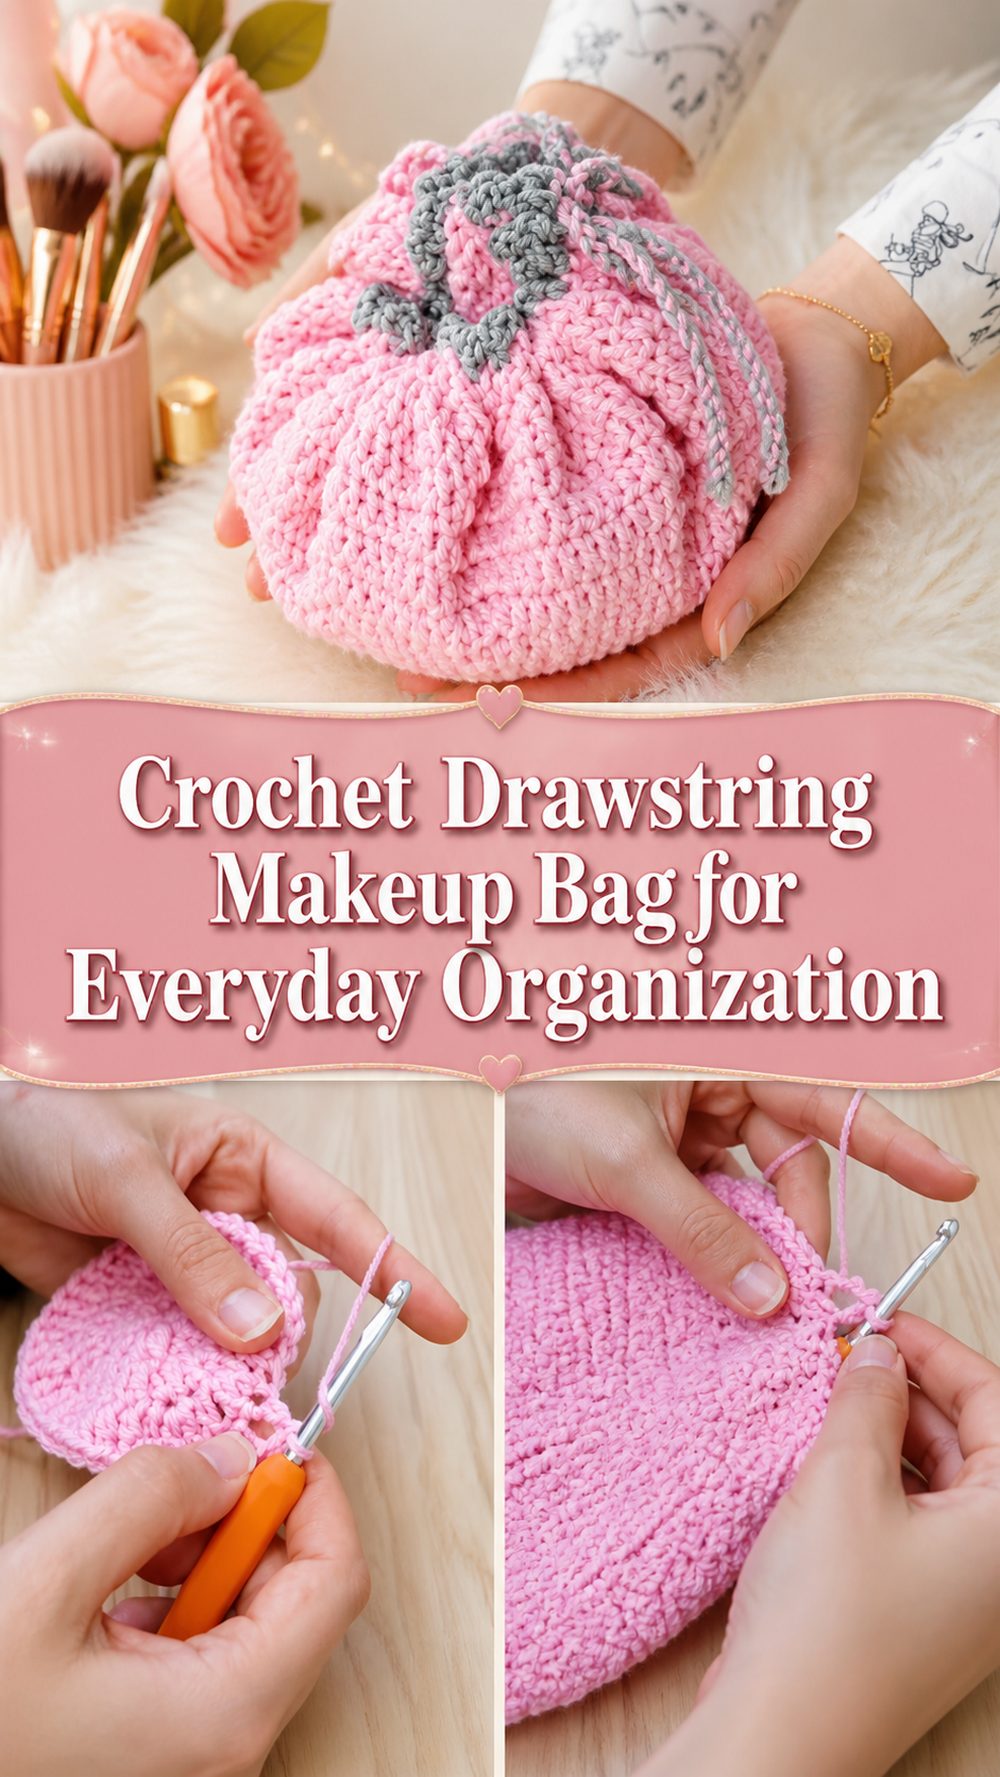
A crochet makeup bag is such a useful little project to have on hand, especially when you want something soft, practical, and pretty at the same time. The YouTube tutorial I selected teaches a drawstring makeup bag, which gives this project a nice twist compared with a standard pouch. Instead of only holding your makeup in one closed shape, this style can open out more easily, which makes it handy for seeing your items at a glance while you get ready. It is a lovely project for keeping everyday essentials together, and it also makes a thoughtful handmade gift. Because the selected tutorial presents it as beginner-friendly, it feels approachable even if you are still getting comfortable with simple bag shapes. The finished result is useful, portable, and easy to personalize with your own yarn colors and finishing details.
Why You’ll Love This Project
This project is fun because it is both decorative and useful. The selected YouTube tutorial specifically describes it as a drawstring makeup bag that holds makeup and also lays flat, which makes it especially practical for everyday use, travel, or keeping small beauty items together in one place.
Materials Needed
- Yarn
- Crochet hook
- Scissors
- Yarn needle
- Stitch markers if you like using them
- Measuring tape
- Drawstring cord, crochet ties, or yarn ties
- Optional beads or cord stoppers for the drawstring ends
Use a yarn and hook size that matches your desired fit and texture.
Best Yarn for This Project
A smooth yarn with good stitch definition works especially well for a makeup bag. Cotton is a great choice if you want the bag to feel a little firmer and easier to shape. A cotton blend can also work nicely if you want a balance between softness and structure. If you prefer a softer pouch, acrylic is another option, though it may drape more. For something that opens and closes often, a yarn that feels sturdy and not overly fuzzy usually gives the best result.
Skill Level
This project is beginner-friendly to easy. The selected tutorial is presented as a beginner-friendly drawstring makeup bag, so it should feel manageable for someone who knows the basics and wants to try a useful pouch project.
Size and Fit Guide
The nice thing about a makeup bag is that the size is very easy to adjust. You can make it smaller for lip balm, compact items, and a few makeup basics, or larger for brushes, skincare, and travel-size products. A good way to size it is to think about what you want to store inside, then keep checking the width and depth as you work. If you want the bag to open out more fully, give it a little extra room. If you want a compact everyday pouch, keep the base and sides a bit smaller.
Stitches Used
The selected search result confirms the project type and beginner-friendly drawstring construction, but it does not show a full written stitch list in the snippet. To stay accurate, it is best to describe the stitches in a flexible way. A project like this is typically built with simple, practical stitches rather than advanced shaping.
Common stitches that may be used include:
- Chain
- Slip stitch
- Single crochet
- Half double crochet
- Double crochet
- Simple rounds or rows
- Spaces for the drawstring opening
How to Make It

Step 1: Start the Base
A crochet makeup bag like this usually starts with the base. This is the part that gives the bag its width and helps decide how roomy it will feel when finished. Depending on the construction style, the base may begin as a circle, oval, or flat shape that gradually builds into the body of the pouch.
As you begin, think about what you plan to keep inside. If you want a bag for just a few daily items, a smaller base is enough. If you want something more generous for travel or a fuller makeup kit, make the base wider so the finished pouch has extra room.
Step 2: Build the Main Body
Once the base is ready, continue crocheting upward to create the body of the bag. This is usually the most relaxing part because the shape starts to appear quickly. A beginner-friendly project like this often repeats the same simple stitches for much of the bag, which makes it easy to settle into a rhythm.
Keep your tension even so the fabric looks neat and the bag shape stays balanced. If the stitches are too loose, the bag may feel floppy and open too much. If they are too tight, the bag may feel stiff and a little harder to pull closed smoothly.
Step 3: Shape the Pouch
As the body grows, the bag begins to take on its pouch shape. Since the selected tutorial describes it as a drawstring makeup bag that can also lay flat, the overall construction is meant to be practical and easy to open. That makes this style especially nice if you like seeing your items more clearly instead of digging around inside a narrow pouch.
At this stage, hold the piece in your hands and gently check how it folds or opens. You want the body to feel roomy enough for your items but still tidy when gathered closed.
Step 4: Create the Drawstring Section
A drawstring bag needs an opening section near the top so the cord or crocheted tie can run through neatly. This is an important part of the project because it affects how easily the bag opens and closes. The top area is often worked in a way that leaves spaces or eyelets for threading the drawstring through.
Try to keep this section even all the way around. If one part is tighter than another, the bag may gather unevenly when pulled closed. A smooth, balanced top edge helps the pouch look polished and work more comfortably.
Step 5: Add the Drawstring
Once the top section is finished, make or insert the drawstring. This can be a simple crochet cord, a chain, an i-cord style tie, or even a strand of yarn or cord that suits the look you want. Thread it through the top opening carefully, making sure it moves freely.
Before tying the ends, test the opening a few times. Pull it closed, loosen it, and check how the fabric gathers. You want the drawstring to glide smoothly without catching too much on the stitches.
Step 6: Check the Capacity
Before weaving in all your ends, place a few items inside the bag to see how it behaves. Try the kinds of items you actually want to carry, such as lip products, a compact, concealer, a small brush, or skincare minis. This gives you a much better idea of whether the size feels right.
Because this drawstring style can open more fully, it is especially handy if you want quick access to your makeup while getting ready. The selected tutorial highlights that practical feature, which is one of the nicest things about this bag design.
Step 7: Finish the Top and Edges
Once you are happy with the size and drawstring movement, tidy the top edge and any finishing rounds. This helps the bag look cleaner and gives it a more complete handmade finish. If the top edge feels too loose, a neat border can help it look more structured.
This is also a nice place to add a little personality. You can keep the bag plain and simple, or dress it up with a contrasting tie, a decorative edging, or small beads at the ends of the drawstring.
Step 8: Weave in Ends and Final Shape
Finish by weaving in all loose ends securely, especially around the top opening and drawstring area. Then gently shape the bag with your hands. Open it, close it, and let the stitches settle into place.
The final result should be a soft, practical crochet makeup bag with a gathered top and a useful pouch shape. Since the selected video specifically presents it as a beginner-friendly drawstring makeup bag that also lays flat, the finished project is meant to be simple, functional, and easy to use.
Helpful Tips
- Choose a yarn that feels sturdy enough for daily use.
- Check the size with real makeup items before finishing.
- Keep the drawstring section even so it gathers smoothly.
- Do not make the top opening too tight.
- Use stitch markers if you are working in rounds.
- Test the drawstring before trimming the ends.
Common Mistakes to Avoid
- Making the base too small for the items you want to store
- Using very loose tension so the bag feels floppy
- Forgetting to leave enough spaces for the drawstring
- Pulling the drawstring too tightly during the first test
- Skipping the step of checking the size with actual makeup items
- Not securing the drawstring ends well enough
Customization Ideas
There are lots of easy ways to make this makeup bag feel personal. You can use soft neutrals for a clean everyday pouch, pretty pastel shades for a feminine look, or bright colors for something cheerful and fun. Add a contrasting drawstring, a textured stitch pattern, beads on the cord ends, or a small lining if you want the inside to feel more polished. You could also make one larger version for skincare and one smaller version for daily makeup.
Style Ideas
This project is lovely for everyday use at home, but it is also perfect for travel bags, handbag organization, or gift giving. A handmade crochet makeup bag looks sweet on a vanity, tucked into a tote, or packed inside a weekend bag. It also works nicely for storing small toiletries, hair accessories, or little craft tools.
Care Instructions
Hand wash gently when needed and lay flat to dry. Since a makeup bag may be opened often and carried around, it helps to reshape it while drying so the pouch and drawstring opening stay neat. Avoid high heat, especially if you are using a softer yarn that may lose shape more easily.
Time Needed
This may take a few hours depending on your speed, yarn, size, and stitch pattern.
Conclusion
A crochet makeup bag is one of those projects that is easy to enjoy because it gives you something pretty and practical all at once. This drawstring version is especially appealing because it is simple, beginner-friendly, and useful in everyday life. You can keep it minimal or personalize it with color and finishing details, and the final pouch is easy to adapt for your own routine. It is a sweet little project that feels handmade in the best way.
FAQs
Is this beginner-friendly?
Yes. The selected YouTube tutorial describes it as a beginner-friendly drawstring makeup bag project.
Can I change the size?
Yes. You can make the base wider or narrower and continue the body until it suits the amount of makeup you want to carry.
What yarn is best for a crochet makeup bag?
Cotton or a cotton blend is a very good choice because it gives the bag a neater, sturdier shape.
Why is a drawstring makeup bag useful?
A drawstring style is handy because it gathers closed neatly and can open more fully when you need to see what is inside. The selected tutorial specifically notes that this bag both holds makeup and lays flat.
Can I use it for things other than makeup?
Yes. It can also work well for small toiletries, jewelry, hair ties, craft notions, or travel bits and pieces.