

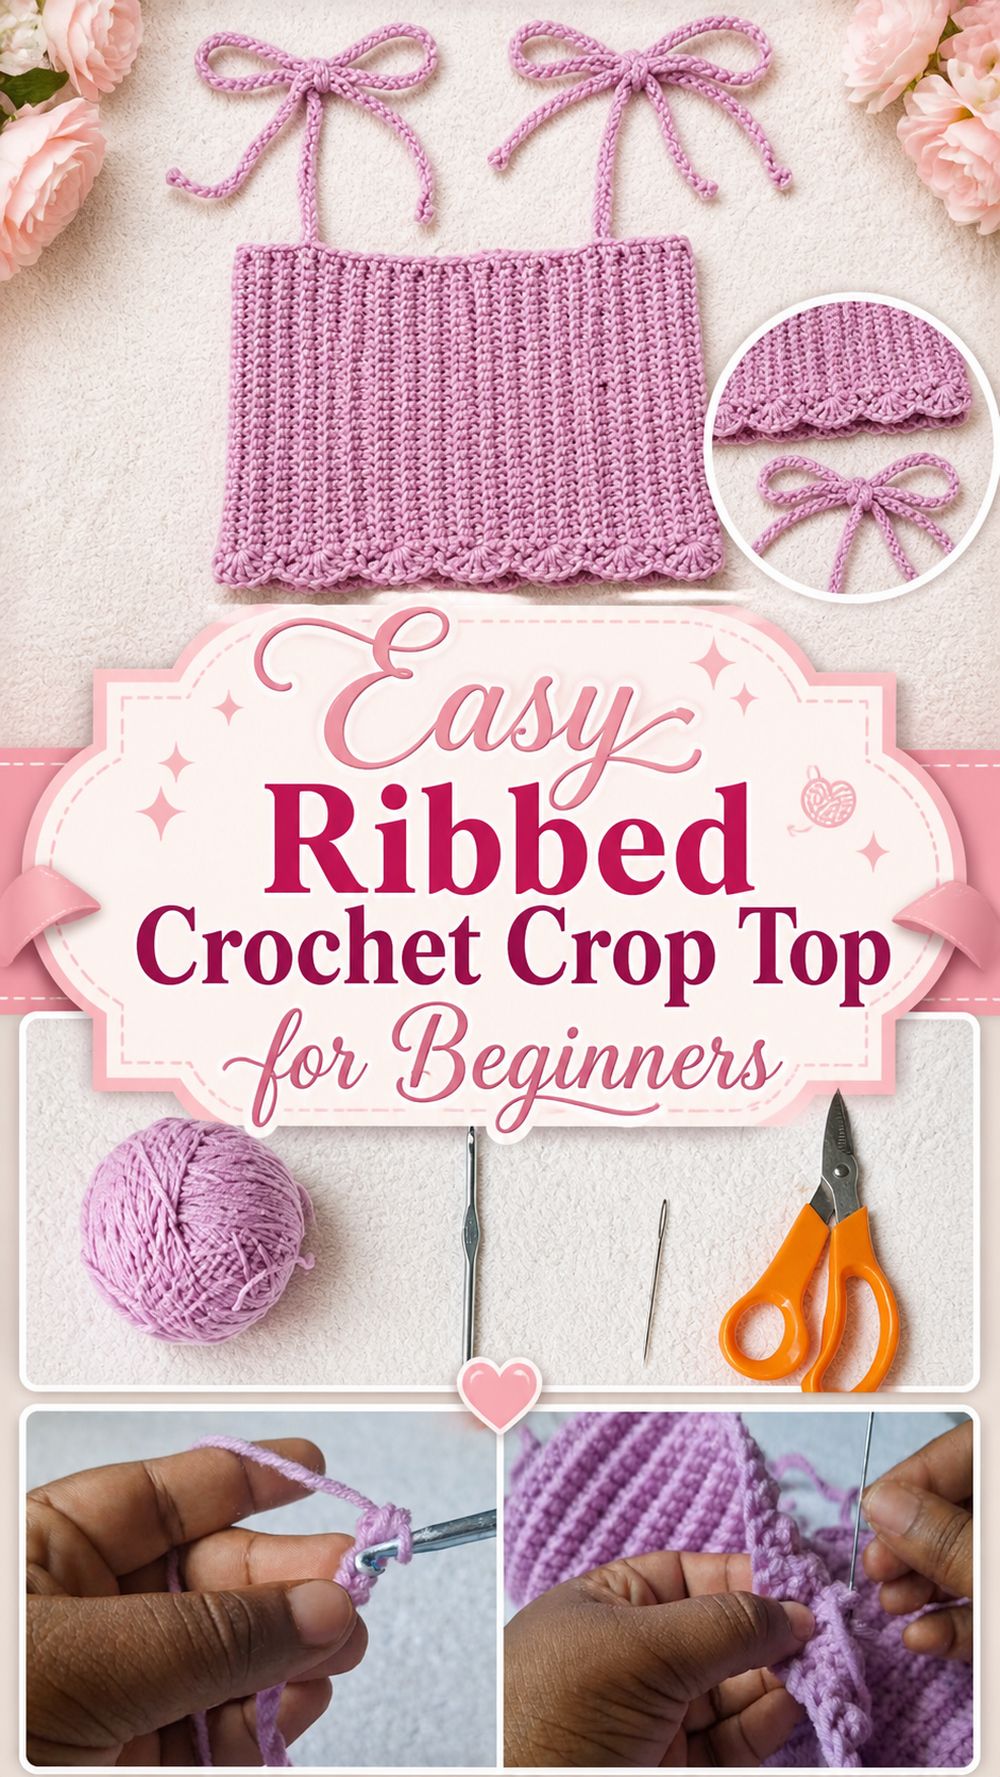
A crochet crop top is one of the most satisfying warm-weather projects because it is stylish, practical, and small enough to feel manageable from start to finish. This ribbed version is especially appealing if you want something simple, flattering, and easy to customize for your own fit. It has that clean handmade look that pairs beautifully with jeans, skirts, shorts, or layered outfits, and it is a great introduction to wearable crochet if you are not ready for a more complicated garment yet. The tutorial I selected teaches a beginner-friendly ribbed crop top and includes sizing from XS to XXL, which makes it a helpful choice for crocheters who want a more adjustable project. It is the kind of top that looks modern, feels comfortable, and gives you plenty of room to personalize the length, fit, and color.
Why You’ll Love This Project:
This project is fun because it turns simple stitches into a wearable piece that looks polished and modern. The ribbed texture gives it stretch and shape, while the beginner-friendly construction makes it feel much less intimidating than many crochet garments.
Materials Needed:
- Yarn for a lightweight wearable top
- Crochet hook
- Scissors
- Yarn needle
- Stitch markers
- Measuring tape
Use a yarn and hook size that matches your desired fit and texture.
Best Yarn for This Project:
For a crop top like this, a soft yarn with some flexibility and decent stitch definition works best. If you want a true summer feel, lightweight cotton, bamboo blend, or another breathable yarn is a lovely choice because it feels cooler and helps the top stay comfortable in warm weather. If you want a little more stretch and softness, a smooth acrylic blend can also work well. Ribbed crochet tends to look especially nice when the yarn is not too fuzzy, because the texture shows more clearly.
Skill Level:
This project is beginner-friendly. The tutorial itself is described as beginner friendly, and the ribbed design suggests a repetitive, approachable structure that newer crocheters can follow without needing advanced lace shaping or complex construction.
Size and Fit Guide:
This design is especially nice because the tutorial indicates a size range from XS to XXL, so it is meant to be adjustable across multiple sizes. The easiest way to personalize the fit is to measure your bust and compare your work as you go. Since ribbed crochet often has some stretch, it helps to check the width without over-pulling the fabric. You can also adjust the crop length by adding or reducing rows before finishing. When making wearables, it is always smart to hold the piece against yourself or compare it with a top you already like before joining or finishing the straps.
Stitches Used:
Because this is a ribbed crop top tutorial, the clearly relevant techniques include:
- Chain
- Slip stitch
- A ribbing stitch pattern, likely worked through a specific loop for texture
- Seaming or joining
- Turning rows
The result is described as a ribbed crop top, so the texture is an important feature of the design. For the exact stitch combination and row structure, follow the visual tutorial directly.
How to Make It:
Step 1: Start the Foundation
Begin by creating the starting chain for the first section of the top. Since this is a ribbed design, the project likely begins in a way that lets the rows build visible vertical texture once the piece is turned and joined into shape. At this stage, focus on keeping your chain even and not too tight. A tight foundation can make the edge pull inward and affect how comfortably the top sits on the body.
Step 2: Build the Ribbed Fabric
Work the stitch pattern row by row to create the ribbed texture. This kind of crochet is especially satisfying because the same repeated motion gradually builds a stretchy-looking fabric with a clean handmade finish. Ribbing works very well for crop tops because it gives the piece a closer fit while still feeling soft and flexible. Keep your tension steady so the ribs look uniform from top to bottom.
Step 3: Shape the Main Body
As the panel grows, continue until you reach the width or length shown in the tutorial for your chosen size. Since the selected video is specifically framed as an XS to XXL tutorial, the project is intended to be adapted by size rather than treated as one fixed measurement. This means you should pay attention to fit throughout the process rather than relying only on a generic finished size. A crop top should feel secure but not restrictive, so check the panel regularly against your body or a similar garment.
Step 4: Create the Second Matching Section
If the top uses matching front and back sections, make the second piece the same way as the first. This is one of the most important moments in a wearable crochet project because even slight differences in length or width can affect the final fit. Count rows, compare edges, and place the pieces side by side while you work. Ribbed projects make this easier because the repeated texture gives you clear visual lines to match.
Step 5: Form the Top Shape
Once the main pieces are ready, follow the tutorial’s shaping for the upper part of the crop top. Depending on the exact construction, this may include joining the sides, leaving openings for the arms, and creating or attaching straps. Since the project is presented as a straightforward beginner-friendly crop top, the shaping is likely kept simple so the finished piece stays wearable without becoming too technical. This is the stage where the top starts to look less like flat crochet and more like an actual garment.
Step 6: Check the Fit Before Final Joining
Before you fully close the seams or finish the straps, check the fit. Make sure the bust area feels secure, the arm openings are comfortable, and the crop length sits where you want it. If you like a snug fit, keep the sides closer. If you want a more relaxed summer feel, allow a little extra ease. This try-on stage can save a lot of frustration later and is especially helpful with handmade tops.
Step 7: Seam and Finish
Join the sections neatly and weave in all loose ends. Take a little extra care with the seams so they sit flat and do not feel bulky against the body. After joining, look over the neckline, lower edge, and straps. A ribbed top often looks best with a clean, minimal finish because the texture itself is already decorative. When complete, the top should feel soft, shaped, and easy to style with warm-weather outfits.
Step 8: Final Look
The finished crop top should have a neat ribbed texture, a flattering cropped shape, and a simple handmade style that feels modern rather than overly fussy. Because the tutorial is described as beginner friendly and size-adjustable, the finished result is meant to be practical, wearable, and achievable for a wide range of crocheters.
Helpful Tips:
- Keep your starting chain loose enough for comfort.
- Check the fit often instead of waiting until the end.
- Count rows so both sections match neatly.
- Use breathable yarn for a more summer-friendly top.
- Mark strap placement before joining.
- Block lightly if you want the fabric to relax and even out.
Common Mistakes to Avoid:
- Making the foundation too tight
- Forgetting to compare both panels as you work
- Not checking stretch before deciding the width
- Making the straps uneven
- Using yarn that feels too heavy for a crop top
- Rushing the seams and ending up with bulky joins
Customization Ideas:
You can make this crop top longer for more coverage, shorter for a more cropped look, or slightly wider for a relaxed fit. It would also look lovely in stripes, neutrals, soft pastels, or bright summer shades. You could add thicker straps, a contrast trim, or even a tie-back detail if you want a more playful finish.
Style Ideas:
Wear it with high-waisted jeans, linen trousers, denim shorts, or layered under an open shirt or cardigan. It also works nicely as a beach-trip top, a festival-style piece, or part of a handmade summer wardrobe.
Care Instructions:
Wash gently according to the yarn label. Hand washing is often the safest option for crochet garments. Reshape while damp and lay flat to dry. Avoid high heat so the top keeps its size and texture.
Time Needed:
This may take a few hours depending on your speed, yarn, size, and stitch pattern.
Conclusion:
This crochet crop top is a lovely project for anyone who wants a simple wearable with a modern look. The ribbed texture keeps it interesting, the fit can be adjusted more easily than many garments, and the finished result is something you can truly make your own. With the right yarn and a little attention to fit, it can become an easy favorite for warm days and layered outfits.
FAQs:
1. Is this project good for beginners?
Yes. The tutorial is described as beginner friendly, which makes it a strong choice for newer crocheters trying a wearable project.
2. Can I adjust the size?
Yes. The selected tutorial indicates sizing from XS to XXL, so it is intended to be made across a range of fits.
3. What yarn is best for a summer crop top?
Lightweight cotton or a breathable bamboo blend is a great option for comfort and stitch definition.
4. How do I make it more comfortable?
Check the width and strap placement before finishing, and choose a yarn that feels soft against the skin.
5. Can I change the length?
Yes. You can add or reduce rows to make it more cropped or a bit longer depending on your style.

