Crochet Vegetable Garland with Cute Carrot Appliques
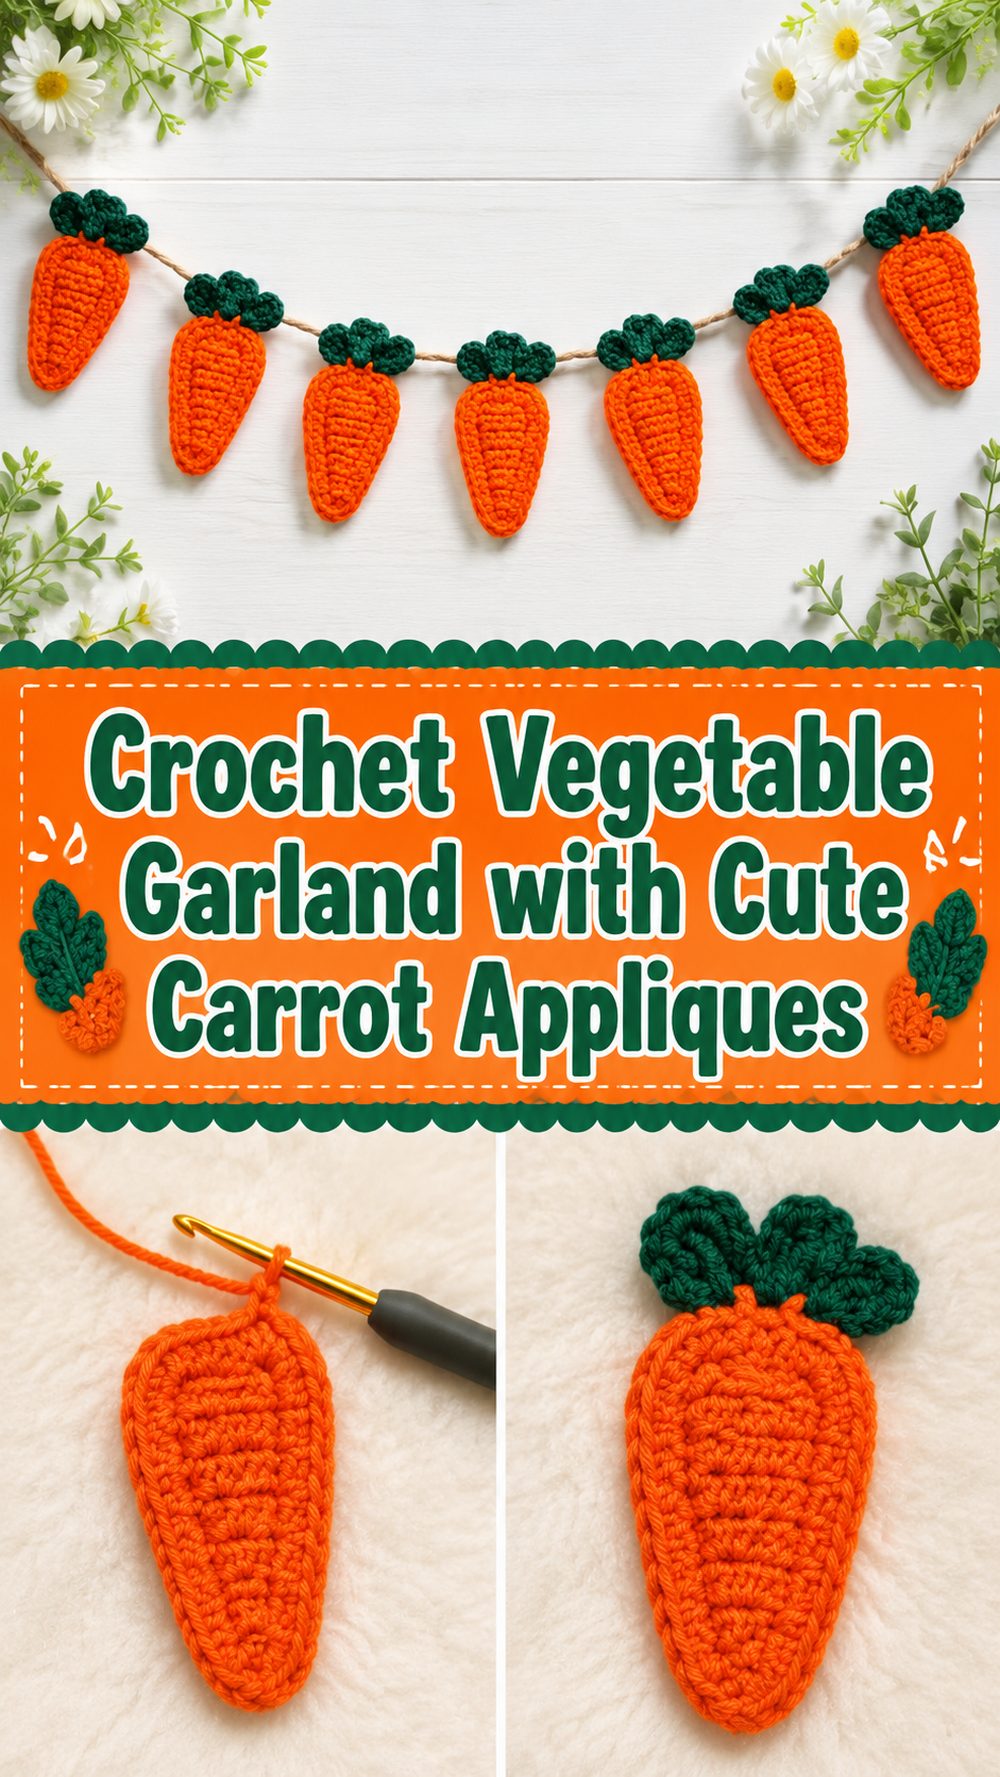
A crochet veggie garland is such a cute way to add a playful handmade touch to your home, especially if you love cheerful seasonal decor with a garden vibe. For this version, the garland is made from simple carrot appliqués, which makes it bright, beginner friendly and easy to customise. It’s the type of project that is perfect for spring decorating, Easter displays, kitchen wall decor, nursery corners, market-themed parties or even a cosy farmhouse shelf. The fun part is that each little carrot is quick to finish so the project feels satisfying from the start. Then when you combine them, suddenly the whole garland looks festive and full of character. The YouTube tutorial I chose is for crochet carrot appliques and specifically says that they can be used as carrot bunting, so it is a good choice for a crochet vegetable garland project.
Why You’ll Love This Project
I like this project because all the pieces are small and simple and satisfying to make but the end result looks charming and decorative when they’re all strung together. A carrot garland gives you that cute veggie theme without being complicated, and it’s easy to adjust for different spaces, seasons and colour styles.
Materials Required:
Orange yarn (for the carrot body)
Green yarn for the leafy top 🙂
Hook ( crochet )
scissors.
Yarn needle
Marker, stitch
Measuring tape if you want your appliques to be a specific size
Yarn or Twine or Cord to Hang the Finished Garland
Choose a yarn and hook size that will give you the fit and texture you want.
Best Yarn For This Pattern
A smooth cotton yarn or soft acrylic is nice for a vegetable garland like this. Cotton is particularly good if you want the carrot appliqués to hold their shape well and look crisp when hung up. And if you want something soft, lightweight and easy to find, acrylic can be beautiful. As this is a decorative piece, yarns with good stitch definition are usually the best choice.
Skill Level:
Suitable for beginners to easy.
It’s a nice project for someone who already knows the basic crochet stitches and wants to practise simple shaping and neat finishing. The tutorial chosen is an easy crochet carrot applique pattern which can be used for bunting.
Size & Fit Guide:
Since this is a garland, the size is adjustable. Choose smaller carrots for a delicate strand or larger for bold wall decor. You can also add or reduce the number of carrots, depending on where you plan to hang the garland. Lay them out on a table or floor before you string them all together, so you can see how long you want the finished strand.
Stitches in use:
Chain
Slip stitch (sl st)
Single crochet
DC – Double Crochet
Basic shaping
Finishing edges
How to Make It
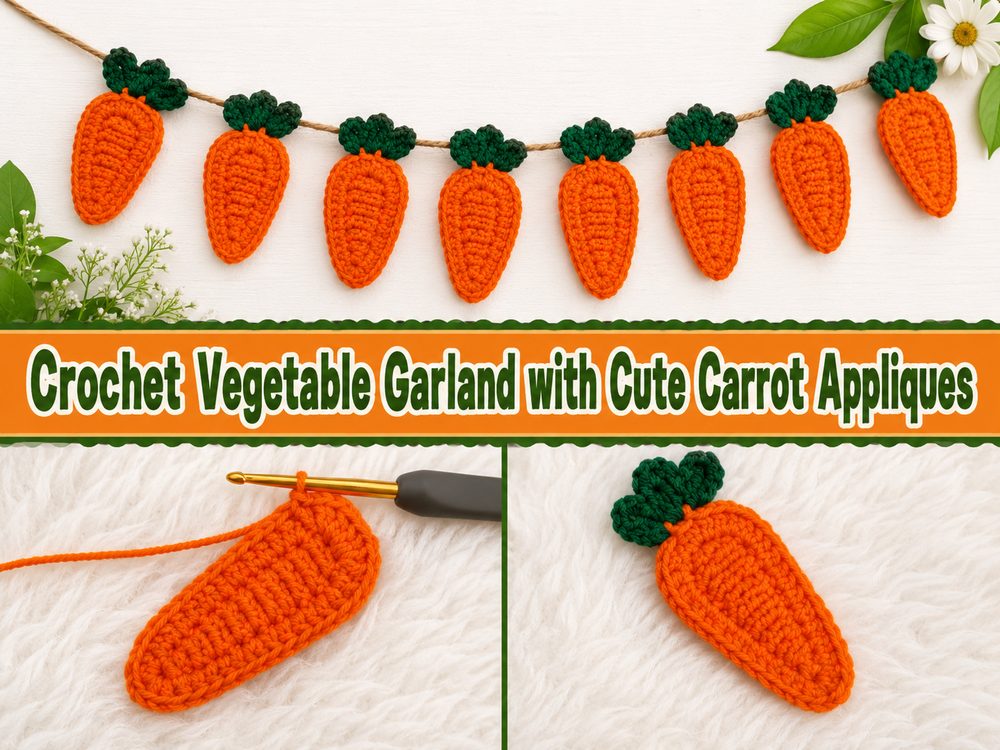
Step 1: Begin the Carrot Shape
The project starts with the carrot applique itself. This kind of motif usually has a base that builds up to a tapered shape so you are working towards that classic carrot shape from the beginning. Work the first few stitches neatly and loosely. If the foundation is too tight the applique can be stiff or pull in on the edges.
At first it may look like a small, flat shape, but that’s okay. The rows continue to develop and the shaping begins to show more clearly the carrot shape.
Step 2: Construct the Main Orange Body
Once the base is done, you continue to work the carrot. This is the part that gets long and narrow like a vegetable. The carrot should be tapered down to a point and more rounded off at the top. It’s that soft modelling that makes theapplique look more natural and decorative.
Work place the piece flat every so often and check that both sides look balanced. It’s always better when the motifs are pretty similar in size for a vegetable garland, so it helps to use your first finished carrot as a guide for the rest of the carrots.
Step 3: Form the Pointed End
One of the little details that really makes this applique identifiable is the pointed end. You don’t want it too sharp or too dull. A soft tapered tip usually looks best because it keeps the carrot cute and decorative as opposed to stiff.
Last shaping stitches at bottom – take your time with these. It doesn’t have to be exactly this, but should feel smooth and balanced. Little tweaks in the last few stitches really add to the finished look.
Step 4: Add green top
Once the orange body is finished, the leafy top gives the carrot its character. This is where the applique really begins to look bright and garden inspired. The green part can be simple and playful, which is a great fit for a garland.
Keep the top light and airy if possible. Good, nice movement and a leafy finish, especially when the carrots are hanging. That little bit of softness at the top adds charm and makes the finished garland feel more lively.
Step 5: More carrots that match4
Make the rest of the carrots in the same style as the one you have finished . A garland is most effective when the parts look related . They don’t have to be the same but if they are of a similar size and shape the strand will look tidier when it is displayed.
Good project for batch producing. You can crochet all the orange bodies first, then add all the green tops, then weave in ends after that. Working on garland projects is often easier and more organised in stages.
Step 6: Review the layout
Lay the carrots out in the order you want them to appear before you attach them to a strand. This step helps you decide on spacing and overall length. If you want a fuller look place them closer to each other. If you want a lighter, airier garland, leave more space between each piece.
Also, for a more fun finish, you can tilt the carrots slightly in different directions. This can give the whole piece a less rigid, more handcrafted look.
Step 7: Assemble the Garland
When you are satisfied with their position, tie the carrots to yarn, cord or twine. Some people like to sew each applique on the hanging strand while others prefer to tie or sew them on after everything is spaced out. I’ve been going for ages.
Make sure the carrots are level and facing forward. This is particularly important if the garland is going to be hung on a wall, shelf, mantel or doorway where the shapes will be readily visible.
Step 8: Finish & Preview
Trim off any excess ends and make sure the leafy tops and carrot points are looking good when all is attached. Gentle blocking can help flatten appliques if they curl a bit before you hang the garland permanently.
The final garland should be bright and playful looking, looking handmade, with happy orange carrots and fresh green tops. It is a cute spring decoration piece, great for garden-themed spaces and cosy kitchen decor.
handy tips
Do one carrot first and use that as your sample for the rest.
Maintain your tension so the appliques are the same size.
The green tops are also very charming, so don’t rush them.
Spread all the pieces out before attaching them to the strand.
Carrots that will hold a crisp shape, use cotton yarn.
If pieces curl at edges, block lightly.
Things to Avoid
Chain is too tight at start
making one side of the carrot larger than the other
Making the pointed tip too thin and rigid
Adding a green top way too bulky for the carrot body.
Carrots attached to the strand before checking spacing
Forgetting to weave in ends neatly on the wrong side
Personalise Ideas
This garland is easily made your own. Opt for soft pastel carrots for spring decor, more vibrant orange for a fun farmhouse look, or muted earth tones for a more rustic feel. You can also add little flowers or leaves or just plain white highlights in between the carrots for a fuller strand if you want. Another cute idea is to combine the carrot appliques with other flat garden motifs later on.
Style Tip
This vegetable garland looks great in a kitchen, breakfast nook, nursery, craft room or holiday display. It also looks beautiful as a mantelpiece, shelf edge, wall hook or party table backdrop. A short version would make a sweet handmade decoration for a basket or a seasonal care package, and would be great for gifting.
Instructions for care
Hand wash gently if needed and lay flat to dry for best results. Avoid high heat, especially if your garland is tied with decorative twine or a softer yarn. If the carrots lose their shape, make them round again while they are still damp and let them dry flat.
Time Required
Depending on your speed, yarn, size, and how many carrot pieces you want in the garland this may take a few hours.
Conclusion
A crochet vegetable garland is such a fun way to bring color and personality into your handmade decor, and this carrot version is especially cute and easy to enjoy. It is simple enough for a relaxed project, but once it is finished, it looks wonderfully cheerful and decorative. You can make it short or long, bold or soft, playful or rustic. It is one of those small crochet projects that feels creative from start to finish.
FAQs
Is this beginner-friendly?
Yes, it is a friendly project for beginners who are comfortable with basic crochet stitches and simple shaping.
What yarn works best for a vegetable garland?
Smooth cotton or acrylic yarn works well because it shows the stitch detail and keeps the appliques looking neat.
Can I adjust the size?
Yes. You can make the carrots smaller or larger by changing your yarn weight, hook size, or overall tension.
Can I use the carrots for something other than a garland?
Yes. The selected tutorial describes them as carrot appliques that can also be used as bunting, so they can work nicely on bags, towels, baskets, or seasonal decor.
How do I make the garland look neater?
Keep the carrots close in size, space them evenly, and check the full layout before attaching everything permanently.