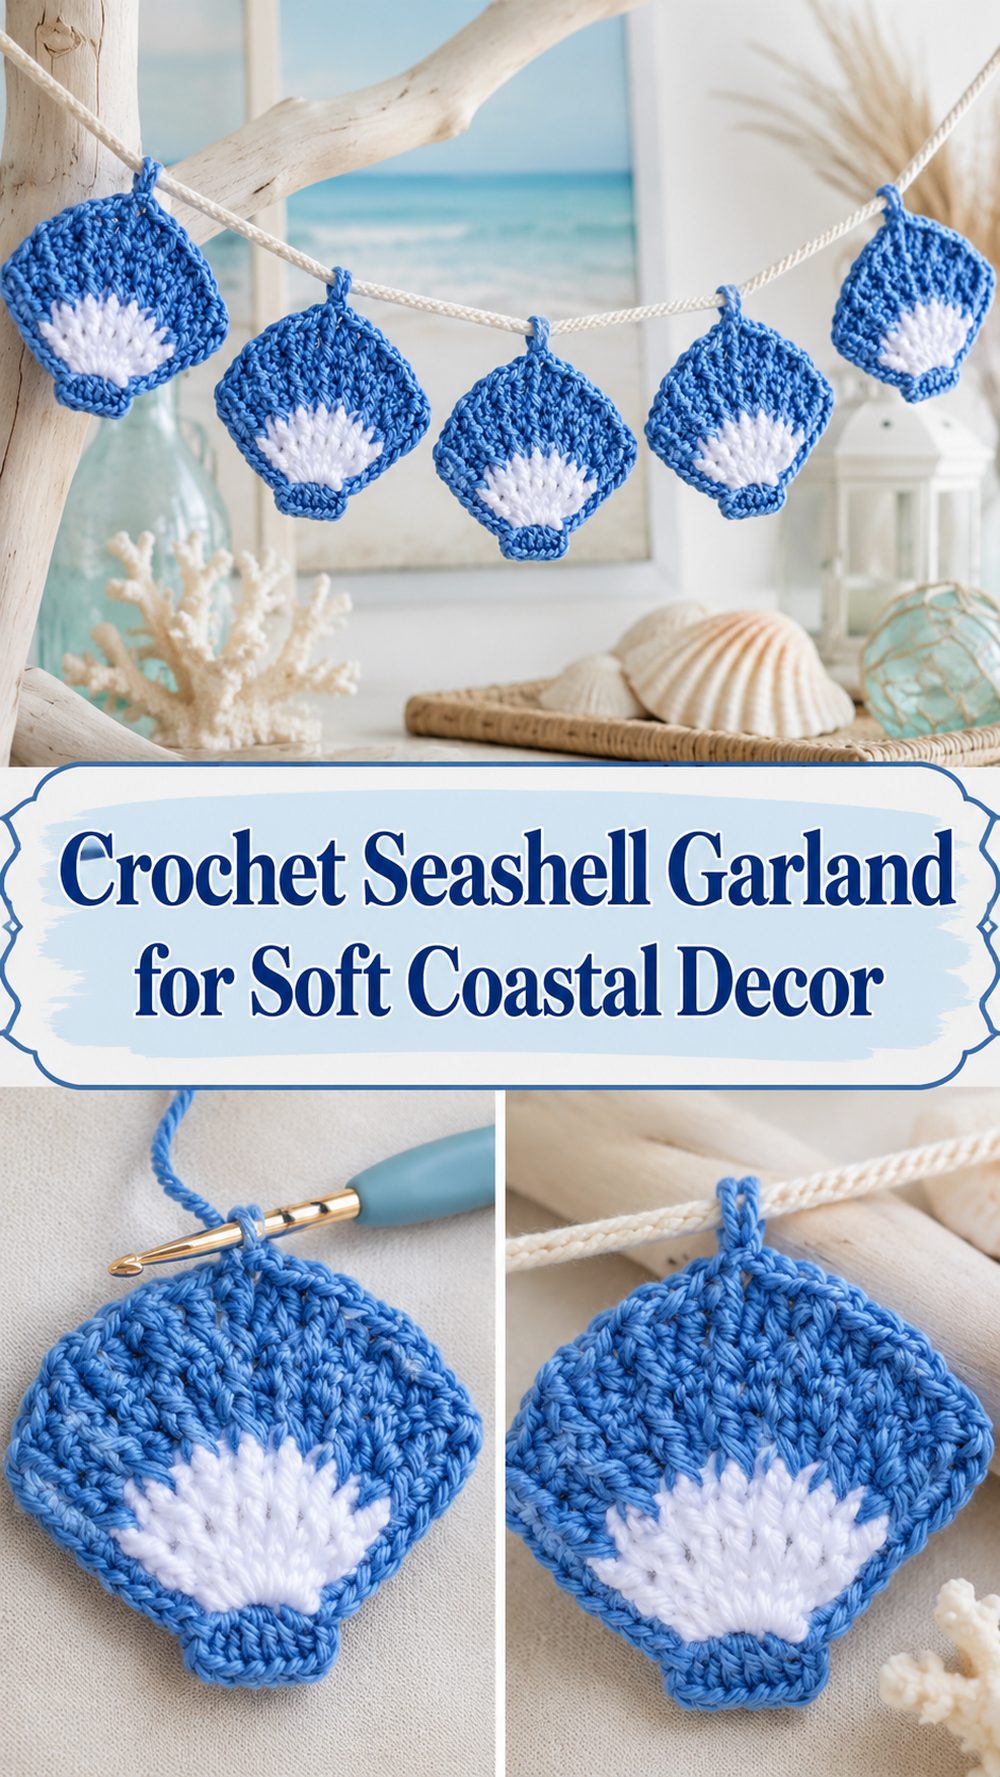
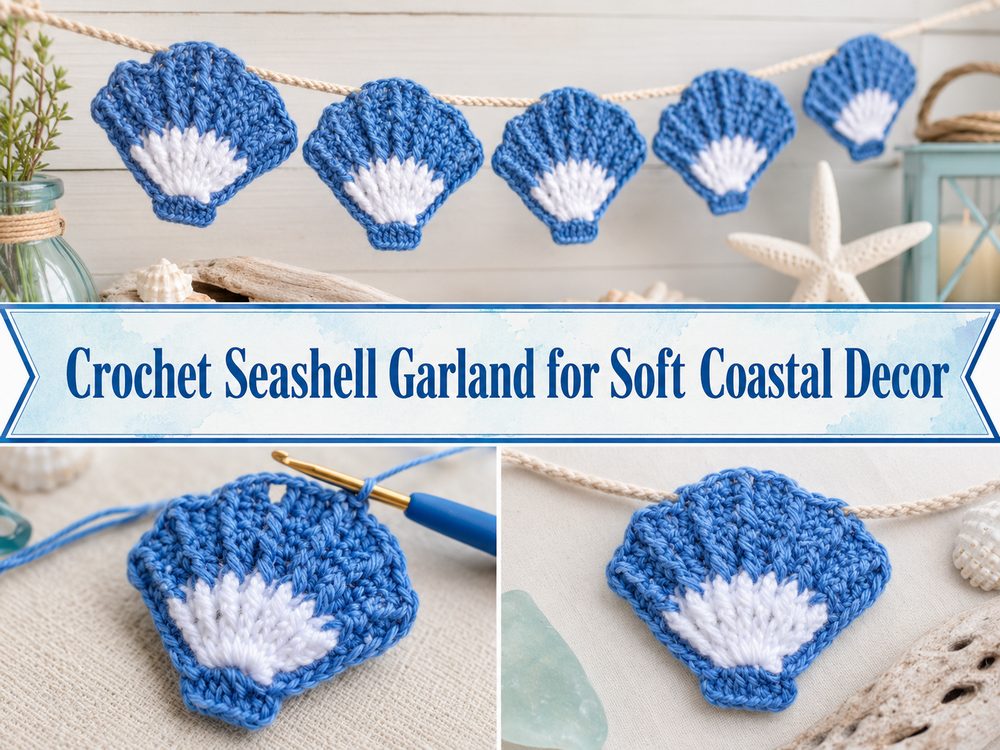
Crochet Seashell Garland for Soft Coastal Decor
A crochet seashell garland is a simple way to bring a soft coastal feel to your home. It works great in a nursery, bathroom, reading corner, summer party set up or beach themed room. Each shell is formed from a small flat motif and the project seems easy to control. Make a couple of shells and join them on a strand and you have a pretty handmade garland with a calm seaside feel.
Why You’ll Love This One
This project is quick, relaxing and useful for home decor. All the seashells are small so you can make one at a time and not feel rushed. The finished garland has a light, handmade, beachy feel. It’s also very easy to customise with different colours, spacing and hanging styles.
Supplies Needed
Seashell coloured yarn
Hook: Crochet
Scissors
Tapestry needle.
Stitch markers (optional)
Yarn, string or twine for hanging.
Measuring tape, if you want a specific length
Pick yarn and hook size according to how firm or soft you want shells to appear.
Best Yarn For This Pattern
Smooth yarns are best to show off the shape of the shell. If you want crisp shells that keep their shape, use cotton. Or, if you want a lighter softer finish, acrylic works too. Beautiful colours for this style are cream, sand, blush, pale blue, seafoam, coral, and pearl.
Skill Level
This is easy for a beginner. Best for crocheters who know the basics and want to practise small decorative shaping. The shells are plain, but a little tension makes the finished garland look tidier.
Size & Fit Guide
The size is flexible as each shell is made separately. Use thinner yarn for smaller, more delicate shells or thicker yarn for a larger wall display. To make a fuller garland, put the shells closer together. For a lighter look, use more space between each shell. Before you join, put it all out so the last strand looks balanced.
Stitches Employed
See the tutorial for exact stitch order. This type of seashell appliqué is usually worked up with basic crochet stitches, curved shaping and clean finishing. The main thing is to keep the shell flat, smooth and nicely formed.
How to Create
Step 1: Launch the First Shell
Before you plan the whole garland, first make one shell. Start with the base, keeping the tension even. If it is too tight at the beginning the shell will curl. If it is too loose the shape won’t look clean.
Step 2: Form the Shell Shape
If you go on, the shell will begin to swell out in a soft fan. Work here slowly so that curves are even. Work with the piece laid flat to see if both sides look balanced.
Step 3: Make the Curved Shell Edge
It’s the curved outside edge that gives the shell it’s real seashell look. Make sure stitches are smooth and don’t pull tight. The curves don’t have to be perfect but the shape should be neat and soft.
Step 4: Refine and Complete the First Piece
When you have finished the first shell, check the outline. Use your fingers to smooth it out and weave in the ends nicely. If the shell curls, gently block flat. This first shell will be your size guide for the rest.
Step 5: Create More Matching Shells
Take the first one as a sample and create more shells. Try to keep them close, especially if you want a tidy garland look. Pick one colour for a soft coastal vibe or mix beach colours for a more fun look.
Step 6: Map Out Your Garland Pattern
Line up all the shells before you attach them. See the spacing, the order of colours, the total length. You can keep the layout simple or add small beads, pearls, tassels or starfish designs in between the shells.
7. Secure the shells to the hanging strand
String the shells on yarn, cord or twine. Soft look with matching yarn, rustic beach feel with twine. Make sure each shell is facing forward and hangs evenly. Be sure to lift the strand before you fasten it completely.
Step 8: Complete and Display
Cut off any loose ends and give the shells one final smooth. Block motifs flat if needed. Drape garland over a shelf, mirror, window, wall, party table or in a beach nursery or bathroom
Helpful Advice
Make one shell first to use as a guide. Keep the tension even so each motif is about the same size. Use smooth yarn so that the shell details show up well. Weave in the ends before joining the garland. Always check the spacing before tying everything up.
Mistakes to Avoid
Do not pull the starting stitches too tight, or the shell will curl in. Do not use fuzzy yarn, it can hide the shape of the shell. Do not put the shells on until the full layout is verified. Also avoid using a stretchy hanging strand which may sag after hanging.
Ideas for customising
Opt for creams and sands for an easy beach-house vibe. You’ll get a soft nursery look with blush and pearl. A brighter ocean theme of seafoam, pale blue and coral. You can also add beads, mini tassels, tiny starfish or extra shells as matching appliqués on bags, baskets or gift wrap.
Style Inspirations
This garland looks lovely in coastal bathrooms, nurseries, beach bedrooms, reading corners, craft rooms and summer party setups. A short strand can be used to decorate a basket, mirror or gift table. A longer strand can become a main accent wall.
Care Instructions
Wash gently by hand, if needed. Dry the shells flat, avoiding high heat. If they lose their shape, smooth them out while damp and lay them flat to dry.
Time Required
How long this project takes depends on your yarn, hook size, speed and how many shells you make, it may take a few hours. If it is a small garland, then you can finish it faster, and a longer decorative strand will take more time.
Conclusion
A crochet seashell garland is such a sweet little project when you want something soft, beachy, and easy to enjoy. Even though the selected tutorial teaches the seashell as a flat applique rather than a full garland-only project, that actually makes it very flexible. You can make as many shell motifs as you like, play with calm coastal colors, and turn them into a strand that fits your own space perfectly. It is simple handmade decor with a lot of charm.
FAQs
Is this beginner-friendly?
Yes. The selected video is described as a step-by-step friendly seashell tutorial, so it looks like a good option for beginners or confident beginners.
What yarn works best for a seashell garland?
A smooth yarn works best because it helps the shell curves and texture show clearly and keeps the motifs looking neat.
Can I adjust the size?
Yes. You can make the shells larger or smaller by changing your yarn, hook, and overall tension, and you can adjust the garland length by adding more motifs.
Can I use the shells for something other than a garland?
Yes. Since the selected tutorial teaches a flat seashell applique, the motifs can also be used on bags, towels, gift wrap, wall hangings, or other decorative crochet projects.
How do I make the garland look neater?
Keep the motifs close in size, weave in ends before assembly, test the spacing first, and lightly block the shells if needed.