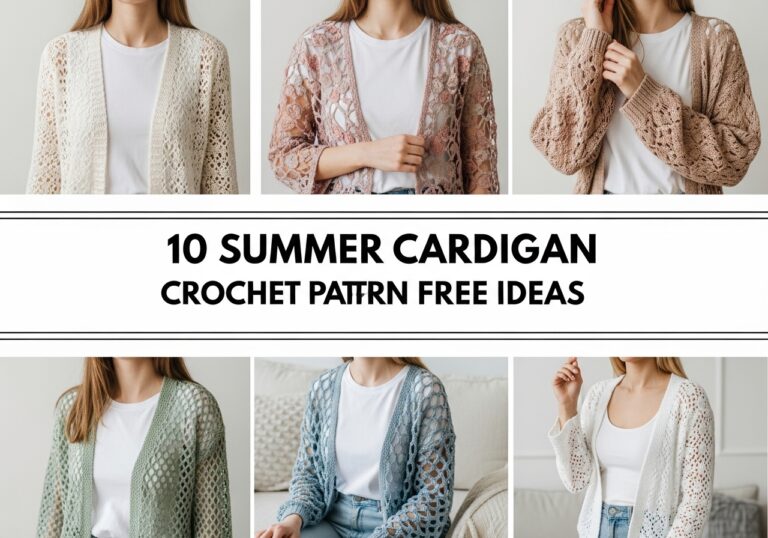
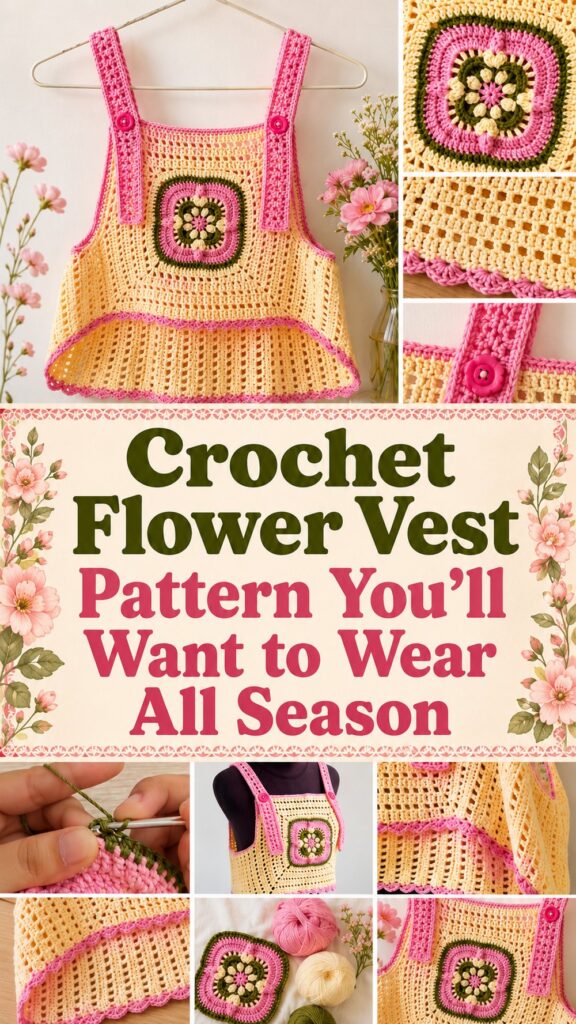
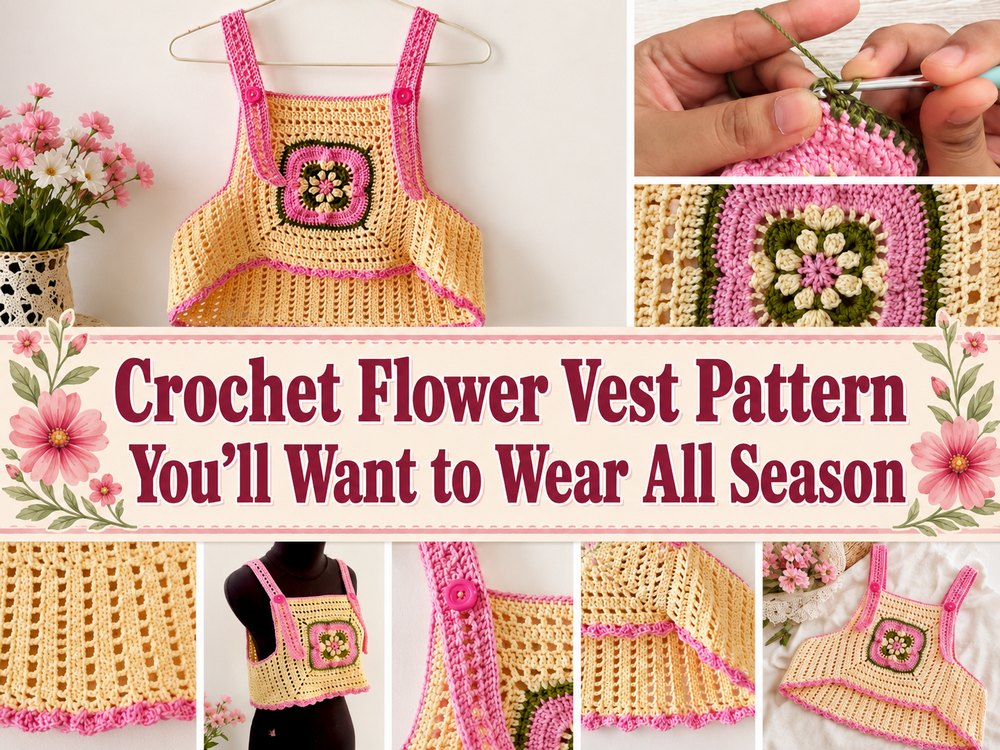
A crochet flower vest is such a fun combination of vintage charm and easy layering. The style is created from floral granny squares joined into a wearable vest, so it feels creative, cozy, and easy to customize as you go.
Why You’ll Love This Project
It’s a nice project for anyone who enjoys motif crochet and would like something pretty yet practical. It has a soft handmade look with the floral squares and is easy to wear over simple tops and dresses with its vest shape.
Yarn Materials
- Crochet hook
- Scissors
- Needle for yarn
- Stitch Markers (If Useful)
Select a yarn and hook size that will achieve the fit and texture you want.
Best Yarn for This Pattern
For a flower vest, choose a soft cotton or cotton-blend yarn so the motifs are clearly visible and the vest is comfortable to layer. Or you can opt for a light acrylic or wool blend for a cozier finish.
Degree of Difficulty
Great for beginners with confidence.
Size & Fit Guide
This vest style is easy to modify since you can add more granny squares in a floral design for added width or length and then position them to fit you. This beginner-friendly tutorial teaches you to make a floral granny square vest, so you can repeat motifs until you get the size you want.
Used Stitches
The tutorial is obviously for granny squares in flowers joined in rounds to make the vest.
How To Do It
Begin the Foundation
Start with the floral granny squares. Work each motif carefully, making sure that the flower center and the outer square are neat and even.
Work the Main
Now keep making squares until you have enough for the front and back. You can see the shape and where they are placed if you lay them out before you join them.
Resize
Add more squares for a longer or roomier vest. You can also stop earlier for a more cropped look.
Become or Join
Join the squares together neatly to form the body of the vest. Leave the arm openings and shape the neck in the arrangement that best fits you.
Finish the Edges
The main body is now finished. Add simple edging around the armholes, neckline and hem for a cleaner finish. The tutorial covers how to make floral granny squares, how to join them, and how to shape them into a vest.
Helpful Hints
- Mark your squares out before joining for a better finish.
- Stitch markers are helpful when laying out your panels.
- Try it on as you go to make sure the armholes are comfortable.
- Maintain a consistent tension so all the squares fit nicely.
- Weave in the ends as you go for easier finishing.
Common Pitfalls to Avoid
- Made squares in a slightly different size
- Joining without checking the layout
- Don’t test the fit around the shoulders
- Pulling the joining stitches too tightly
- Edge finishing skip
Ideas for customization
Choose a soft pastel palette for cottage style or bold, bright flowers for retro. You could make it cropped, longer, open front or add buttons if you want a more finished cardigan style vest.
Styling Tips
This vest is beautiful over a plain tee, a fitted long-sleeved top, a dress or a tank. It’s also a sweet handmade gift for someone who loves vintage inspired pieces.
Care Instructions
Wash in cool water; reshape when damp and lay flat to dry. This helps the motifs hold their shape and keeps the vest looking fresh.
Time Required
This can take a couple of hours depending on your speed, yarn, size and stitch pattern.
Conclusion
If you love floral crochet and easy to wear projects, this flower vest is a beautiful one to try. It has that handmade charm that always stands out and you can really make it your own.
FAQs
Can beginners make this flower vest?
Yes, but it is best for confident beginners who are comfortable repeating motif rounds and joining pieces.
Can I make it longer?
Yes. Just repeat until you reach your desired length.
Do I have to use the same yarn as the tutorial?
No. Choose a yarn that gives you the texture and drape you want.
Can I make it more fitted or oversized?
Yes. Add or reduce motifs and check the fit as you go.
Do I need to block the squares?
It really helps. Blocking makes joining easier and gives the vest a cleaner shape.