

A crochet granny square hat is such a fun way to turn a classic motif into something stylish and wearable. The tutorial I selected teaches a granny square beanie in a clear step-by-step way, making it a lovely project for anyone who enjoys simple shapes, cozy texture, and that familiar handmade charm granny squares always bring. This kind of hat is especially satisfying because you get to build small pieces first, then join them into a finished item that looks creative and eye-catching. It is also a nice project for using color combinations you already love, whether you want something bright and playful or soft and neutral. If you enjoy crochet that feels relaxing but still gives you a finished piece with lots of personality, this is a very enjoyable hat to make and wear.
Why You’ll Love This Project
This project is fun because it combines the charm of granny squares with the usefulness of an everyday hat. Instead of working a plain hat from start to finish in one shape, you get the satisfaction of making motifs first and then watching them turn into a wearable piece. It feels creative, cozy, and very rewarding.
Materials Needed
- Yarn
- Crochet hook
- Scissors
- Yarn needle
- Stitch markers
- Measuring tape
Use a yarn and hook size that matches your desired fit and texture.
Best Yarn for This Project
For a granny square hat, a soft yarn with clear stitch definition usually works best. If you want a cozy everyday hat, soft acrylic or a wool blend can be a great choice because it gives the hat warmth and structure without feeling too stiff. If you prefer a lighter feel, you can also use a softer medium-weight yarn that keeps the squares neat while still feeling comfortable to wear. Since this project is built from granny squares, a yarn that shows your color changes and stitch pattern clearly will help the finished hat look especially nice. The selected tutorial presents the project as a beginner-friendly granny square beanie, so a yarn that is easy to work with is a smart choice here.
Skill Level
This project is beginner-friendly. The selected video describes the granny square beanie as a detailed step-by-step tutorial and says it is beginner friendly, which makes it a good choice for newer crocheters who already know a few basic stitches.
Size and Fit Guide
To adjust the size, measure the head before joining everything together. Because this hat is made from granny squares, the fit can be checked by arranging the finished squares around the head area as you go. You can make the hat larger or smaller by adjusting the size of each square, changing the yarn and hook combination, or adding rounds if needed. Once the squares are joined, check the depth of the hat and add edging or extra length if the design allows. It is always helpful to test the fit before finishing.
Stitches Used
The full stitch list is not completely available from the search snippet, so the safest description is:
- Chain
- Slip stitch
- Granny clusters or granny stitch groups
- Basic joining
- Simple finishing rounds or edging
The tutorial clearly identifies the project as a granny square beanie, so granny-style cluster work is central to the design.
How to Make It
Step 1: Crochet the Granny Squares
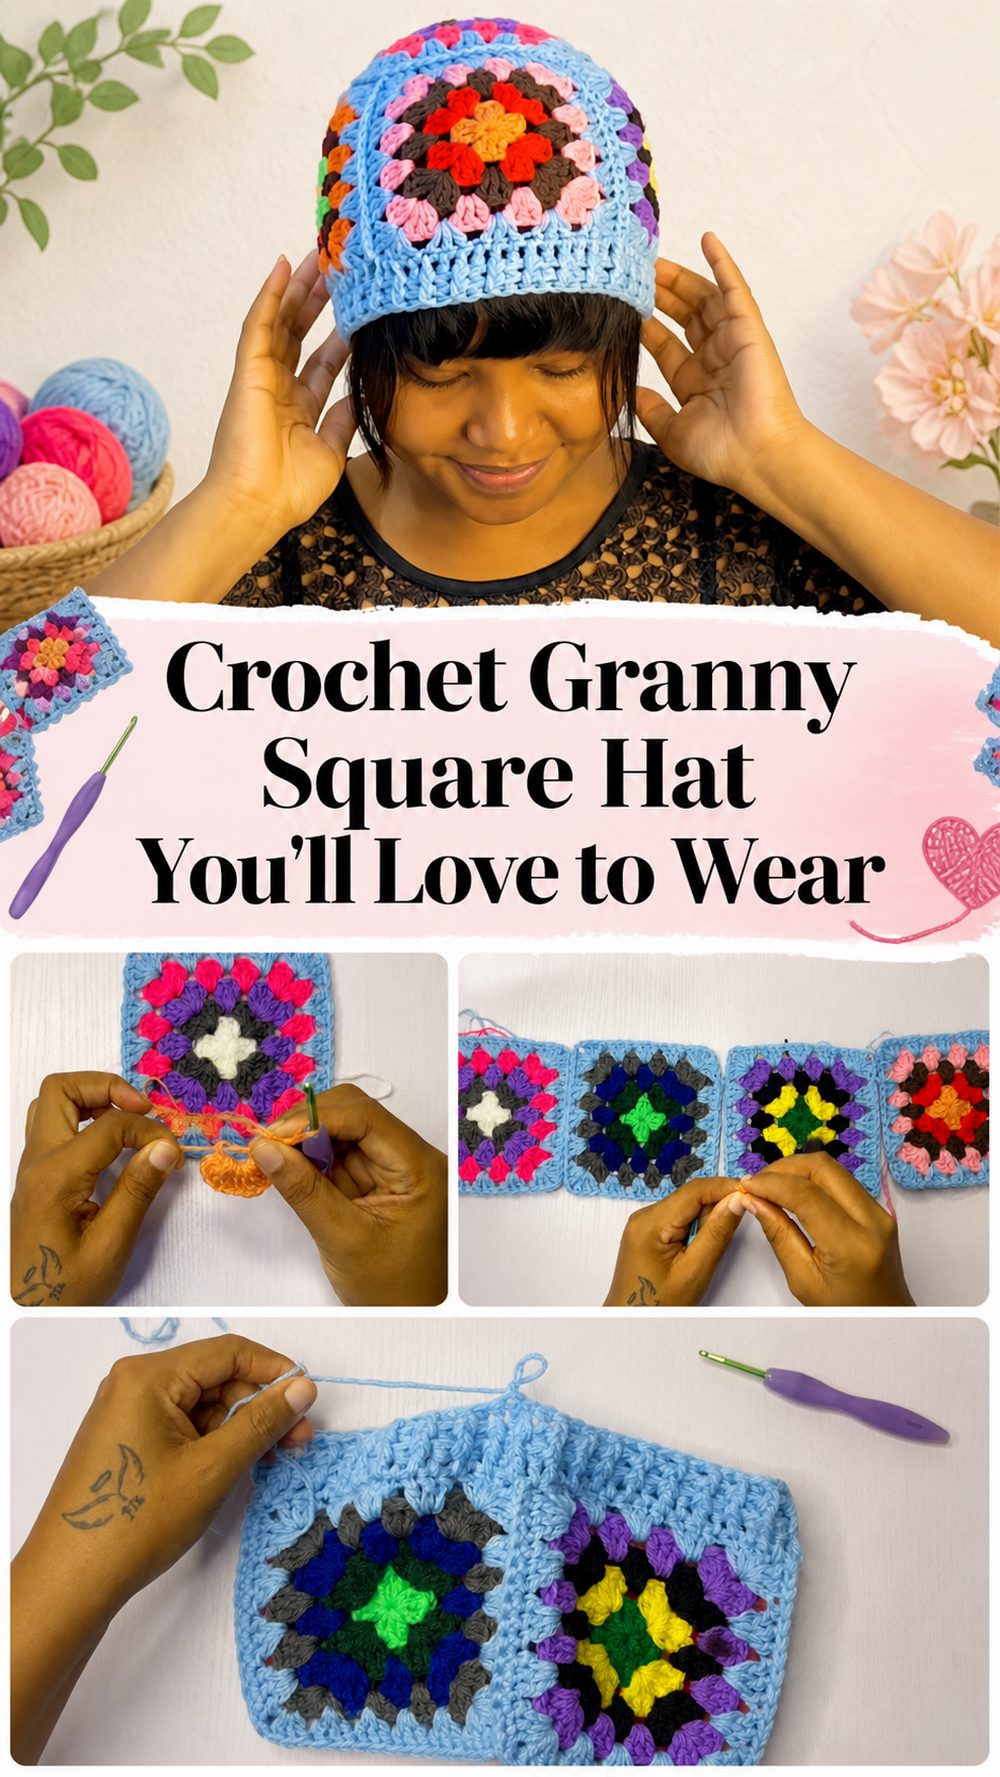
The project begins by making the granny squares that form the body of the hat. This is a nice way to start because each square feels small and manageable on its own. You begin in the center, then build outward with repeating rounds until each square reaches the size needed for the hat. This is where you can really enjoy your color choices. You might use one color for a simple look or change colors from round to round for a more traditional granny square style.
As you work, try to keep your tension even so that all the squares end up matching as closely as possible. That matters a lot in a project like this, because uneven squares can make joining more difficult later. If you are making several motifs, it helps to finish one completely and then use it as your visual guide for the rest.
Step 2: Make Enough Squares for the Hat Shape
Once you understand the square pattern, continue making the number of squares needed for the hat. A granny square hat usually relies on repeated motifs joined together to form the top and sides, so consistency matters more than speed here. Lay the squares out as you go so you can see how the final hat shape will come together.
This is also the best point to think about sizing. If the arranged squares look too small, you can add another round before making the remaining motifs. If they seem too large, you may want to stop a little sooner on the next square. Since exact counts and measurements are not clearly available from the source snippet, the safest approach is to keep checking the layout visually and compare it with the size you want for the finished hat.
Step 3: Join the Squares
After the motifs are finished, the next step is joining them into a hat shape. This is where the project really comes to life. You connect the squares edge to edge so they begin forming the crown and sides of the beanie. Depending on the joining method used in the tutorial, the seams may look neat and subtle or become part of the decorative style.
Take your time with this stage. Neat joining makes a big difference in how polished the finished hat looks. Use stitch markers if needed to hold matching corners or sides together before you seam them. It can also help to lay the pieces flat first so you do not accidentally twist the arrangement. Once joined correctly, the squares should start looking like a real hat rather than separate motifs.
Step 4: Shape the Hat
After the main squares are connected, the hat is shaped and refined. This part may include closing the top neatly, smoothing the edges, or adding rounds to help the hat sit more comfortably. Since granny square hats can sometimes look boxy before finishing, this stage is important for making the piece feel more wearable and balanced.
Check the fit as soon as the joined shape is stable enough to try on. The hat should sit comfortably around the head without pulling too tightly at the seams. If it needs a little more depth, some finishing rounds can help. If it feels a bit loose, edging can bring it in slightly. The selected tutorial is described as a detailed beginner-friendly granny square beanie tutorial, so the shaping and finishing are meant to be approachable rather than overly technical.
Step 5: Add the Finishing Edge
A finishing edge helps the hat look tidy and feel comfortable. This lower edge can make the hat sit better on the head and can also tie the whole design together visually. A simple border in one of the square colors often works beautifully and gives the hat a cleaner, more finished appearance.
At this point, take time to look over the entire hat. Check that the seams are secure, the edge feels smooth, and the overall shape sits nicely. If one section seems uneven, gentle blocking can help relax and settle the finished fabric. This final touch is especially useful when working with motifs because it helps everything look more uniform.
Step 6: Enjoy the Final Look
The finished hat should have that lovely mix of classic granny-square charm and modern wearable style. It will look handmade in the best way, with visible motifs that add texture, color, and personality. Whether you keep it neutral or make it bright and bold, the overall result feels cozy, creative, and fun to wear.
Helpful Tips
- Make one full square first and use it as a guide for the rest.
- Keep all squares the same size for easier joining.
- Use stitch markers when matching edges for seaming.
- Check the fit before fully finishing the hat.
- Weave in ends as you go if you use multiple colors.
- Block lightly at the end for a neater shape.
Common Mistakes to Avoid
- Making each granny square a slightly different size
- Joining the motifs in the wrong arrangement
- Pulling seams too tightly and distorting the shape
- Forgetting to check the fit before finishing the edge
- Using a yarn that makes the motifs too stiff or bulky
- Leaving lots of loose ends to deal with at the very end
Customization Ideas
This hat is easy to personalize. You can go for classic multi-color granny squares, a soft pastel palette, earthy neutrals, or even a single-color version for a simpler look. You can also change the mood of the hat by using bold contrasting centers or matching everything for a calmer finish. If you want a slightly slouchier look, work the squares a bit larger or add a little more depth during finishing. A decorative edge or pom-pom could also give it extra personality.
Style Ideas
A granny square hat looks great with casual outfits, denim jackets, oversized sweaters, simple tees, and relaxed weekend clothes. It also makes a thoughtful handmade gift for someone who loves colorful accessories or retro-inspired crochet pieces. If you enjoy matching sets, you could even make it coordinate with a granny square bag or scarf.
Care Instructions
Hand wash gently when possible, especially if the hat includes multiple joined motifs and several woven ends. Use cool or lukewarm water and mild soap, then press out extra water without twisting. Lay it flat to dry and reshape it gently so the squares and seams stay neat.
Time Needed
This may take a few hours depending on your speed, yarn, size, and how many color changes you use.
Conclusion
A crochet granny square hat is such a cheerful and satisfying project to make. It takes the familiar beauty of granny squares and turns them into something useful, cozy, and full of style. You can keep it simple or playful, adjust the colors to suit your taste, and enjoy the process of building a wearable piece one motif at a time. Once you finish one, it is easy to imagine making another in a completely different color palette.
FAQs
Is this beginner-friendly?
Yes. The selected tutorial is described as a detailed step-by-step granny square beanie tutorial and says it is beginner friendly.
What yarn is best for this hat?
A soft yarn with good stitch definition works well, especially acrylic or a wool blend for a cozy everyday beanie.
Can I adjust the size?
Yes. You can adjust the fit by changing the size of the granny squares, your yarn choice, or the finishing rounds.
Do all the squares need to match exactly?
They should be as close in size as possible so the seams line up neatly and the hat shape looks balanced.
Can I use multiple colors?
Yes. Granny square hats look especially lovely in multi-color combinations, but a single-color version can also look beautiful.

