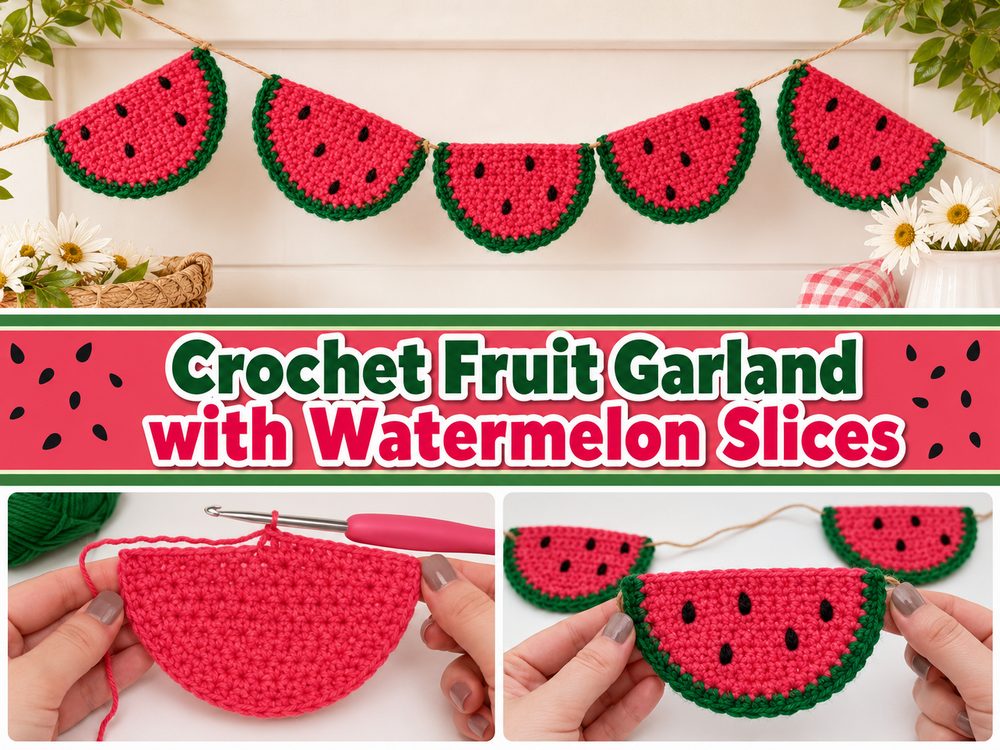
Crochet Fruit Garland with Watermelon Slices
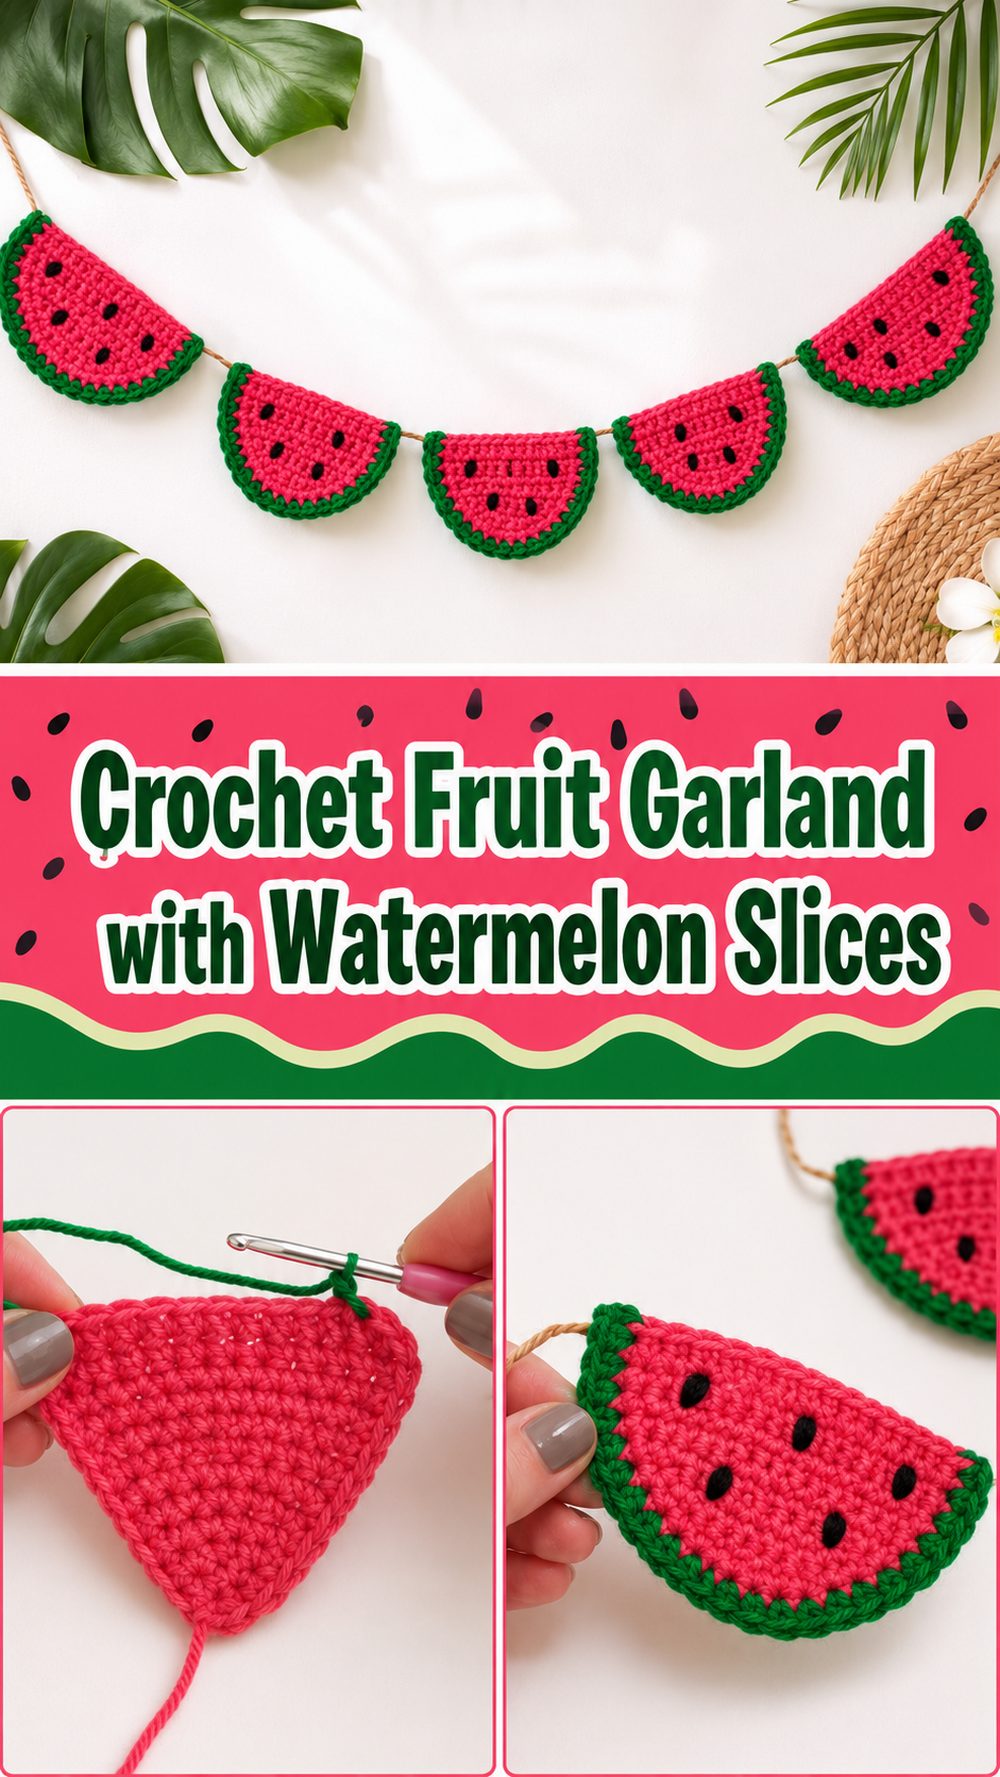
A crochet fruit garland is such a cheerful way to decorate a space, especially when you want something playful, colorful, and handmade. This version uses sweet little watermelon-style slices, which makes it feel perfect for summer kitchens, party decor, picnic setups, nurseries, or craft rooms that need a bright touch. It is the kind of project that feels fun from the very beginning because each piece is small and satisfying to finish, and once you string them together, the whole thing looks instantly festive. It is also a lovely project for using simple yarn colors in a creative way. If you enjoy quick decorative crochet pieces that can also double as appliques, this is a really enjoyable make. The tutorial I selected teaches a crochet watermelon garland made from flat slice motifs that can also be used as appliques or small coasters.
Why You’ll Love This Project
This project is fun because it gives you a full decorative result without feeling difficult. Each fruit slice is worked on its own, so you can make a few at a time, and the finished garland looks bright, cute, and perfect for warm-weather decorating. The selected tutorial presents the slices as a garland project and also suggests they can work as appliques or coasters, which makes the design especially versatile.
Materials Needed
- Pink or red yarn for the fruit center
- Green yarn for the rind
- Black yarn for the seed details
- Crochet hook
- Scissors
- Yarn needle or tapestry needle
- Stitch markers
- Jute, yarn, or cord for stringing the garland
Use a yarn and hook size that matches your desired fit and texture.
Best Yarn for This Project:
For a fruit garland like this, a smooth worsted-weight yarn works beautifully because it helps the slices keep their shape and makes the colors stand out clearly. Cotton is great if you want a crisp, sturdy finish, while acrylic can work well if you want something soft, affordable, and easy to find. For decorative garlands, the best yarn is one that shows the stitch shape nicely and does not look too fuzzy.
Skill Level:
This is beginner-friendly to easy.
It is a nice project for crocheters who know basic stitches and want to practice simple shaping, clean edges, and neat finishing. Since the fruit slices are made one by one, it also feels less overwhelming than a larger project.
Size and Fit Guide:
Because this is a decorative garland, the size is very easy to adjust. You can make smaller slices for a delicate hanging strand or larger slices for bolder decor. You can also choose how many fruit pieces to make depending on where you want to hang the garland. Hold the finished slices against your wall, shelf, window, or party table area to decide how full you want the strand to look.
Stitches Used:
- Chain
- Slip stitch
- Single crochet
- Single crochet decrease
- Flat rows
- Border stitching
- Simple hand-sewn detail work for the seeds
How to Make It
Step 1: Start the Fruit Base
This fruit garland begins with the flat watermelon slice base. Instead of working in a full round, the slice is built in rows so it can form that soft half-circle fruit shape. You start with a foundation chain, then build the body with simple rows of stitches. This creates a strong base for the fruity center.
At first, the shape looks more like a little panel than a fruit slice, and that is completely normal. The curved effect starts to appear as the shaping continues. Keep your stitches as even as possible so the top edge stays neat and the body feels balanced.
Step 2: Shape the Watermelon Slice
As you move through the rows, the slice starts narrowing gradually. This shaping is what turns a plain rectangle-like start into a sweet little fruit wedge. Gentle decreases near the ends help create the tapered upper part while still leaving enough width through the middle to keep that classic watermelon look.
This stage is very satisfying because the motif starts to become recognizable quite quickly. Lay the piece flat every now and then and check that both sides are shaping evenly. Since these slices will be displayed side by side in a garland, making them close in size helps the finished strand look neat and intentional.
Step 3: Add the Rind Border
Once the main fruit section is complete, the rind is added around the curved outer edge. This green border is what really makes the motif look like watermelon instead of a simple triangle or wedge. It frames the fruit center beautifully and gives the slice a finished decorative look.
Take your time on the border so it stays smooth. When you work around an edge instead of straight across a row, it helps to keep your spacing steady. If the border is too tight, the slice may pucker. If it is too loose, the edge may look floppy. A balanced border makes the whole fruit shape look much cleaner.
Step 4: Stitch the Seeds
The black seed details are small, but they add so much character. They are usually sewn on after the crochet part is finished, which makes it easier to place them where they look best. This also gives you control over how simple or detailed you want each watermelon slice to be.
Keep the seeds small and evenly spaced. You do not need many to create the effect. A few neat little seed shapes across the center are enough to make the slice instantly recognizable. This is also a nice step to personalize. You can make the seeds more playful, more minimal, or slightly varied for a handmade look.
Step 5: Make More Slices
A fruit garland really starts to come alive once you have several pieces finished. Make as many slices as you need for your space. For a small shelf or kitchen corner, a short strand may be enough. For a party backdrop, mantel, or window, you may want to make a longer set.
Try to keep the slices similar in size, especially if they will hang in a straight line. One simple way to do that is to count your foundation carefully and repeat the same shaping style for each motif. If one turns out slightly different, that is not a problem. Handmade garlands still look charming with small natural variations.
Step 6: String the Garland Together
After all the watermelon slices are done, it is time to turn them into a garland. This is where the whole project starts to feel decorative and complete. Use jute, yarn, or another cord-like strand to connect the slices. A natural jute string gives a rustic summer look, while matching yarn can make the garland feel softer and more coordinated.
Leave a little space between each fruit slice if you want a lighter, airier garland. If you want a fuller look, place them closer together. Before securing everything permanently, lay the pieces out in a line to see how the spacing feels.
Step 7: Finish and Display
Once the slices are attached, check that they hang evenly. Trim any stray ends, make sure the motifs face the right way, and lightly shape them with your hands if needed. If the slices curl a bit, a gentle blocking can help them lie flatter before you assemble them.
The finished garland should look bright, playful, and summery, with clear fruit coloring, a smooth rind edge, and tiny seed details. It is the kind of decoration that looks lovely over a shelf, across a wall, in a kitchen, at a birthday table, or even in a child’s room.
Helpful Tips
- Keep your tension even so all the slices come out a similar size.
- Make one full slice first and use it as a visual guide for the rest.
- Do not rush the rind border because it defines the fruit shape.
- Sew the seeds on after finishing the crochet for a cleaner look.
- Test the spacing of the slices before tying everything into place.
- Use a cord or jute that suits the style of your decor.
Common Mistakes to Avoid
- Starting with a chain that is too tight
- Making the decreases uneven so one side looks off
- Pulling the rind border too tightly around the edge
- Adding seeds that are too large for the slice
- Forgetting to compare slices as you make multiples
- Stringing the motifs too close together or too far apart without checking the look first
Customization Ideas
You can easily personalize this fruit garland. Make it brighter with vivid watermelon shades, or soften it with pastel fruit colors for a nursery or spring display. You could also turn the same idea into a mixed fruit strand by adding lemon, orange, or strawberry-inspired motifs. Another cute option is to use the slices individually as gift tags, appliques, or mini coasters instead of hanging every single one.
Style Ideas
This garland looks lovely across a kitchen window, on a summer party table, over a mantel, or as part of picnic-themed decor. It would also be sweet in a child’s play kitchen or fruit-themed nursery corner. For gifting, you could even make a short version to decorate a basket, jar, or handmade present.
Care Instructions
If the garland needs cleaning, gentle hand washing is the safest choice. Lay the pieces flat to dry and avoid high heat, especially if they are attached to jute or decorative cord. If the slices lose shape, smooth them back into place while damp and let them dry flat before rehanging.
Time Needed
This may take a few hours depending on your speed, yarn, size, and how many fruit slices you want in the finished garland.
Conclusion
A crochet fruit garland is such a happy little project, and this watermelon-style version is especially fun for bright seasonal decorating. It is simple enough to enjoy without stress, but detailed enough to look really charming when finished. You can make a short strand for a small space or a longer one for a bigger display, and you can always adjust the colors and spacing to fit your style. It is a lovely way to bring a handmade summer feeling into your home.
FAQs
Is this beginner-friendly?
Yes, it is a nice beginner-friendly project for anyone comfortable with basic stitches and simple shaping.
What yarn works best for this garland?
A smooth yarn works best so the fruit shape, rind, and seed details show clearly.
Can I adjust the size of each fruit slice?
Yes. You can change the size by using different yarn weights, hook sizes, or by slightly adjusting the overall motif.
Can I use the slices for something other than a garland?
Yes. These fruit slices can also be used as appliques or small decorative pieces, which matches the selected tutorial description.
How do I make the garland look neater?
Keep the slices similar in size, place the seeds carefully, and test the spacing before securing them onto the strand.