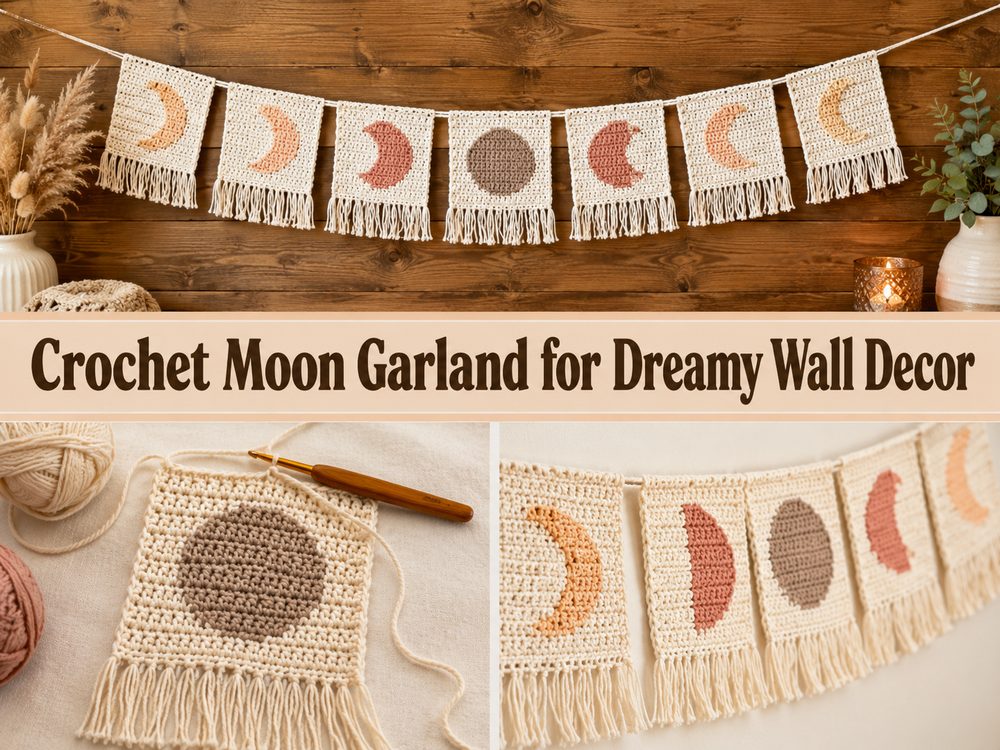
Crochet Moon Garland for Dreamy Wall Decor

A crochet moon garland is such a nice project when you want something soft, calming and a bit magical. And it’s a sweet handmade touch to a nursery, bedroom, reading corner, seasonal display, or cosy craft space without being too heavy or complicated.
This kind of project is nice because each moon is small enough to be nice and relaxing to make, and the finished garland looks thoughtful and decorative when all the pieces are put together. It’s also a great way to play with simple colours such as cream, white, soft grey, dusty blue or warm gold tones.
The tutorial I chose is a YouTube video of a crochet moon phases garland pattern and the description snippet for the video says that it is super easy and beginner friendly and shows the whole process step by step.
Why You Will Love This Project
This project is fun because it is peaceful to make and pretty to display. A moon garland has a soft decorative style that works in so many spaces. And because the selected tutorial is specifically for a moon phases garland it gives you a design that already works perfectly in wall decor.
What You Will Need
Thread for the moon motifs
Crochet hook
scissors.
A yarn needle
Stitch markers if you like to keep track of your place
Yarn, twine or cord for hanging garland
measuring tape for a specific finished length
Choose a yarn and hook size that will give you the fit and feel you want.
Recommended Yarn for This Project:
A smooth yarn is particularly good for a moon garland because it emphasises the curves of the moon. If you want the moons to hold their shape nicely then cotton is nice. If you want a softer, cosier look, a soft acrylic or baby yarn can also be a beautiful choice. For this type of project, cream, ivory, pale grey, dusty blue and muted gold all work very well.
Required Skill Level:
Suitable for beginners to easy level.
The tutorial selected is described as super easy and beginner friendly so this seems like a good choice for newer crocheters that want to make a decorative project without advanced shaping or complicated construction.
Size & Fit Guide:
Since this is a garland, size is very flexible. Create smaller moons for a delicate strand, or larger moons for a more noticeable wall display. You can also change the finished length by making more motifs, and changing the spacing in between them. Line up the moons in a row before stringing everything together so you can see how full or airy you want the garland to look.
Stitches Utilised:
The selected YouTube result is clear in that it identifies the project as a crochet moon phases garland and states the tutorial covers everything needed, but the search snippet does not list each stitch by name. Best thought of as a straightforward decorative crochet project, with basic stitches, gentle shaping and neat finishing.
How to Make It
Step 1: Initiate the First Moon
Instead of thinking of the whole garland at once, start by making one moon first. This makes things seem so much easier and more fun. The first thing you want to start with a moon motif is a clean smooth shape. So take your time on the first piece, because it will guide you through the rest.
Work your stitches evenly and loosely. If the work is too tight the shape of the moon may become stiff and draw in a little. The outline may not look as neat if the stitches are very loose. Curves will feel soft and polished with a good tension balance.
Step 2 Make the Moon Shape
As the motif develops the moon begins to take on that curved celestial look. This is the part that really makes the project. A moon should look soft and flowing in shape, not sharp or heavy, so pausing now and then to look at the entire outline, not just the last stitch you put in, can help.
Work the flat piece. This makes it easier to tell whether the curve feels smooth and balanced. Some slight handmade variation is fine, especially in a decorative garland, but you want the overall shape to still feel obviously like a moon.
If you’re doing moon phases, keep the shapes consistent in style so the finished strand looks connected and intentional.
Step 3: Sharpen the Curves
This type of garland depends a great deal upon having a clean outline. The moon motif is simple so even small details matter. When the main shape is done, take a moment to check the edges. Sometimes one of the curves appears a little fuller than the other, and very often you can improve the overall look just by smoothing the shape with your hands and finishing it off neatly.
And this is where the project starts to feel satisfying. A simple little motif suddenly starts to look special and decorative. Crochet always does such a nice job of showing off soft curves, especially in light, quiet shades.
Step 4: Clean Up the First Piece
Finish the first moon and fasten off and carefully weave in the ends. It is a garland, so it is of great help in keeping the back neat. As decorative pieces can twist a bit when hanging, a clean finish makes everything look better.
A soft block can be useful to flatten the moon if it is a bit curled. Even a light shaping with your hands can improve its look. This is a small detail but it makes the finished garland look more polished.
Step 5: Complete the Rest of the Moons
When you are happy with the first one, repeat the process for the rest. Here is where the project gets relaxing. If you know the shape already, you can get into an easy rhythm and just enjoy making a small set of matching motifs.
Try to keep the moons about the same size. They don’t have to be identical but matching proportions will make the finished garland look much tidier. An easy way to do this is to compare each new piece to the first one before you finish fastening it off.
Lay out the shapes for a moon phase look so they feel visually balanced from one end of the garland to the other.
Step 6: Plan Where to Hang Garlands
Before glueing anything, lay out all the finished moons on a table or on the floor. This makes it much easier to determine the spacing and overall length. If the motifs are placed close together, the garland will look fuller and more decorative. The further apart they are the more lightweight and airy the finished look will be.
If you’re using multiple shades, this is also a good time to experiment with the order of the colours. One colour garland feels calm and minimal, and a mix of soft neutrals can elevate the project and make it feel a little more layered and dreamy.
You might also think about whether you want to add anything in between the moons, like stars, beads, tassels or little drops hanging down. The moon garland is lovely as it is, but adding a few things can help to personalise it.
Step 7: Connect the Moons Together
When the layout is correct, attach the moons to a length of yarn, cord or twine. The coordinating yarn creates a soft, blended look. Twine or cord can give a slightly more rustic or decorative look. Choose whatever fits the room and the look you want.
Attach the motifs so that they are even and facing forward. Then before you fix everything, hold up the garland and look at it hanging. Sometimes the spacing looks different once the strand is vertical, so this little check can save you from having to redo it later.
Step 8: Add finishing touches
If the moons are attached, trim any loose ends and check the full balance of the garland. If one moon is too close to another, or hangs a little crooked, fix it now. Small changes have a great impact on a simple decorative project like this.
If necessary, block the motifs a final time softly so that they drape as neatly as possible. The finished garland should feel soft and calm and heavenly with simple handmade beauty that fits in all kinds of cosy spaces.
Helpful Hints
Make one moon first and use it as a template for the rest.
Keep your tension even so the motifs are approximately the same size.
As you go, lay each piece flat to check the curves.
Weave in the ends before assembly for a tidier final strand.
Try the spacing out before you attach everything for good.
If you want a dreamy bedroom or nursery feel, use soft shades.
Things to Avoid
Sewing so tight the moon is stiff
Rushing the shaping and getting uneven curves
let each motif be of a very different size
Add the moons, before testing the layout
Using a strand that is way too long hanging
Omitting to raise the garland before final placement
Customisation Ideas
There are so many beautiful ways to customise a moon garland. For a soft celestial style keep it simple with cream or white moons or go with gold, beige, grey or dusty blue for a more layered look. Between the moons beautiful tiny stars and underneath little tassels could add to the decorative. You can also blend moon shades for a moon-phase inspired colour story.
Style Advice
A crochet moon garland looks lovely over a bed, across a nursery wall, above a bookshelf or in a reading nook. It also works beautifully for baby showers, celestial rooms and calm seasonal decorating. A shorter strand is great for decorating a mirror or shelf, while a longer strand is a great soft statement on a wall.
Care Instructions
If the garland requires cleaning, gentle hand washing is usually best. Lay motifs flat in the absence of heat to dry. If the moons lose shape a bit, smooth them when damp and let them dry flat before hanging again.
Time Required
Depending on your speed, yarn, size and how many moon motifs you want in the finished garland this could take a few hours.
Conclusion
A crochet moon garland is such a peaceful and satisfying project to make. It is simple enough to enjoy without stress, but once the motifs are joined together, it has a really lovely decorative effect. You can keep it minimal, make it dreamy and soft, or add little extra celestial details to suit your own style. It is the kind of handmade decor that feels warm, personal, and easy to love.
FAQs
Is this beginner-friendly?
Yes. The selected tutorial is described as super easy and beginner friendly, so it looks like a nice choice for newer crocheters.
What yarn works best for a moon garland?
A smooth yarn works very well because it helps the moon shape show clearly and keeps the finished motifs looking neat.
Can I adjust the size?
Yes. You can make the moons larger or smaller by changing your yarn, hook, and tension, and you can adjust the garland length by making more or fewer motifs.
Can I use the moon motifs for something other than a garland?
Yes. Flat moon motifs can also work nicely as appliques, gift decorations, wall-hanging accents, or add-on pieces for other crochet projects.
How do I make the garland look neater?
Keep the motifs similar in size, test the spacing before assembly, weave in the ends carefully, and lightly block the pieces if needed.