Bright Crochet Sun Garland for Happy Summer Decor

This crochet sun garland is such a cheerful little project to make when you are after something warm, playful and handmade for your space. It has that light summer feel that works so beautifully in a nursery, craft room, reading corner, party backdrop or sunny kitchen wall. The best thing about this kind of project is that each sun motif is small enough to be quick and satisfying, but when several are joined together, the entire garland has a festive and personality-filled look. It’s also a beautiful way to creatively use bright scraps of yarn. I picked a YouTube video tutorial for a specific crochet sun applique pattern for a summer garland, which is a very strong match for this project and suggests a flat sun motif meant for decorative use.
Why You’re Going to Love This Project
This project is fun because it is small, bright and simple to copy. Once you get the first sun done, the rest are usually a lot easier and the garland comes together in a really satisfying way. The tutorial we have selected is literally a sun applique for a summer garland, so it is ideal for decorative crochet.
Materials Required
Sun in yellow string
Orange yarn if you want a deeper effect or a warm border.
Crochet Needle
scissors.
A yarn needle
Use stitch markers if you like to keep track of your place
Yarn, cord or twine for stringing finished garland on
Choose a yarn and hook size that you like for the fit and texture you want.
Best Yarn for This Project:
A smooth yarn is especially good for a sun garland, as it helps the round shape and any rays show clearly. If you want the suns to keep their shape neatly, cotton is a good choice. If you want a lighter and somewhat fluffier decorative finish, a soft acrylic can also work well. Bright yellow shades are the obvious favourite here but golden tones, soft lemon shades or even sunset inspired colours can look beautiful too.
Skill Level:
This is beginner friendly easy.
This chosen result is a crochet sun appliqué for a summer garland. It is best suited to crocheters who are happy with basic stitches, simple shaping and neat finishing.
Size & Fit Guide »
The size is very flexible as this is a garland. You can make tiny suns for a delicate strand or big ones for a bold wall display. You can also change the final length by adding more motifs and changing the distance between them . Lay out the suns in a row before putting it all together to decide how full or airy you want the garland to be.
Stitches Employed:
The selected YouTube result clearly states the project is a crochet sun appliqué for a summer garland, but the search snippet does not provide all stitches used in detail. It is best to treat it as a flat decorative motif made with basic crochet stitches, rounded shaping and simple finishing, rather than any complex construction.
How to Make It
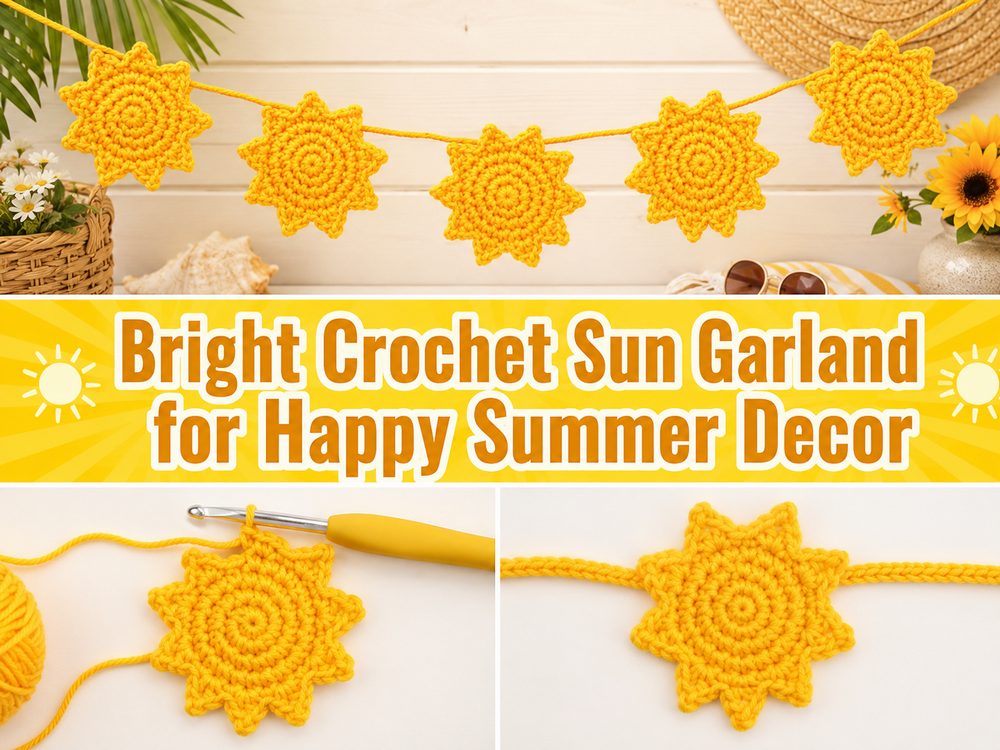
Step 1: Initiate the First Sun
Don’t try to think of the whole garland at once. First, think of one sun motif. This makes the project look easy and fun from the beginning. Sun appliques are often made as flat shapes. The first job is to make a neat centre to give a good foundation for the rest of the shape.
Try to keep your tension even, As this is to hang as decor the motif looks best when it is flat and has a balanced outline. If it is too tight in the middle, the sun can start to cup. It may not look as tidy if it is too loose.
Your first completed sun is your guide for the rest so it’s worth taking your time on that one.
Step 2: Make the Main Sun Shape
When the center is turned on, the body of the sun expands outwards into a round shape. This part should be smooth and even. The final motif has a bright polished look with a neat round base, especially when several are to be hung together in a row.
Once in a while, stop and lay the piece flat. Make sure it is staying smooth and balanced. A sun motif doesn’t have to be mathematically perfect to look lovely, but it should feel nicely rounded before adding the outer details.
This is also where the project really begins to be satisfying. Already the simple round form makes the motif look cheerful and decorative.
Step 3: Add Sun Rays
The rays are what make the piece a real sun and not just a round applique. This is the most playful part of the design, it gives the motif its energy and character. The rays can be soft and cute or a little more bold and pointed, depending on the look you want.
Work around the edge carefully so the rays stay nice and even. They don’t have to be the same but balanced spacing will make the finished garland look much neater. Once the rays are in place the motif usually looks instantly brighter and more recognisable.
It’s also the point at which you can set the mood of your garland. A simple ray design gives a sweet, minimal look, whereas a fuller edge can make the suns feel more lively and decorative.
Step 4: Finish the Edges Cleanly
Once the main sun shape is finished, just do a nice finish and weave in the ends. The back should be kept clean more than people think, particularly with a garland where the motifs might shift and turn a little when hanging.
If the edges look a little uneven, just shape the sun gently with your hands. Small crochet motifs tend to lie better when the ends are woven in and the piece is laid out.
If needed the suns can be helped to lie flatter and look more uniform before assembly with a very light block.
Step 5: Add More Matching Suns
Once your first sun is done, do the same with the rest of the garland. This part is very relaxing as you already get the shape. Making several motifs in a row is a good way to build up the finished decoration so you don’t feel rushed.
Try to make them about the same size. They don’t have to be exact but if they are in the same proportions it will make the final strand look more put together. A simple trick is to put each new sun next to the first one before finally fastening off.
You could keep all the suns one bright yellow or mix up the shades a bit for a softer handmade look.
Step 6: Planning Garland Placement
Lay out all the suns on a table or floor before you attach them to a strand. This will give you an idea of the spacing and overall length. The closer arrangement makes the garland look more decorative and fuller. More space gives a lighter, airier feel.
This is also the best point to consider if you want to put anything in between the suns. Little clouds, beads, tassels or just simple pom-poms could be nice, but the suns are happy on their own too.
Test the garland against the spot where you want to display it. A short strand looks good over a shelf or small window, but a longer one can be a bright focal point on a wall or party table.
Step 7: Attach Suns to Hanging Strand
When you are happy with the layout, attach the suns to a length of yarn, cord or twine. Using a matching yarn creates a softer, more blended look. Twine can add a rustic, homemade feel. Either way is nice depending on your style.
When you attach them, make sure the suns are level and facing forward. Lift the strand and see how it looks hanging before you fasten them up tight. That little check lets you fix up spacing before it’s all over.
This is where the whole project really comes to life. A few simple motifs become a bright decorative garland.
Step 8: Finishing Touches
Once the suns are attached, trim any loose ends and check the balance. If one motif is too close to another or hangs a little crooked now is the time to fix it. Those little changes make for a much cleaner finished garland.
If the suns have curled edges, gently flatten by hand or weight lightly. When all is in order the garland is ready to hang.
The finished piece looks sunny, warm and playful with little bright motifs that instantly give a happy handmade feel to the room.
Tips and Tricks
Make a whole sun first. Use that as your sample for all the rest.
Make the tension equal so the motifs are about the same size.
Make sure each sun is flat before you make the next.
Weave in ends before assembly for a neater finish.
Try the spacing on the table before you glue everything in place.
Use bright, smooth yarn so the shape of the sun is clearly visible.
Common Mistakes to Avoid
- Making the center too tight so the motif cups
- Letting the rays become uneven without checking the full shape
- Making each sun a very different size by accident
- Attaching the motifs before planning the spacing
- Using a hanging strand that stretches too much
- Forgetting to hold the garland up before final placement
Ideas for Customisation
There are tonnes of cute ways to make this garland more personal. For a bright summer look, go with classic yellow suns, softer golden shades for a warm nursery theme, or sunset colours for something a little more artistic. You could also add little clouds between the suns, add a moon motif to a sky-themed garland, or sew a simple smiling face on each sun for a playful child-friendly version.
Style Suggestions
A crochet sun garland makes a beautiful addition to a nursery shelf, bedroom wall, a reading corner or summer party decor. It also looks great in a playroom, craft room or classroom display. A shorter version can be a sweet addition to a window or basket, while a longer one can make a bright statement piece.
Care Instructions
If the garland needs cleaning, hand washing is generally the safest option. Lay motifs flat to dry, but no high heat. If they stretch a little, give them a gentle smooth while damp, and dry them flat before hanging them up again.
Required Time
Depending on your speed, yarn, size, and how many sun motifs you want in the finished garland, this could take a few hours.
Conclusion
A crochet sun garland is such a happy little project to make when you want something bright, simple, and handmade. It gives you the fun of finishing small motifs, then turns them into a cheerful display once they are joined together. You can keep it minimal, add extra sky-themed details, or play with color until it fits your style perfectly. It is the kind of crochet decor that instantly makes a space feel warmer.
FAQs
Is this beginner-friendly?
Yes. It is a good project for beginners or confident beginners who are comfortable with basic stitches and simple motif shaping.
What yarn works best for a sun garland?
A smooth cotton or acrylic yarn works well because it helps the round shape and rays show clearly.
Can I adjust the size?
Yes. You can make the suns larger or smaller by changing your yarn, hook, and overall tension, and you can change the garland length by adding more motifs.
Can I use the suns for something other than a garland?
Yes. Since the selected tutorial is for a sun appliqué pattern for a summer garland, the motifs should also work nicely as appliques on bags, clothes, wall hangings, or other decor.
How do I make the garland look neater?
Keep the motifs similar in size, test the spacing before assembly, weave in ends cleanly, and lightly block the suns if needed.