
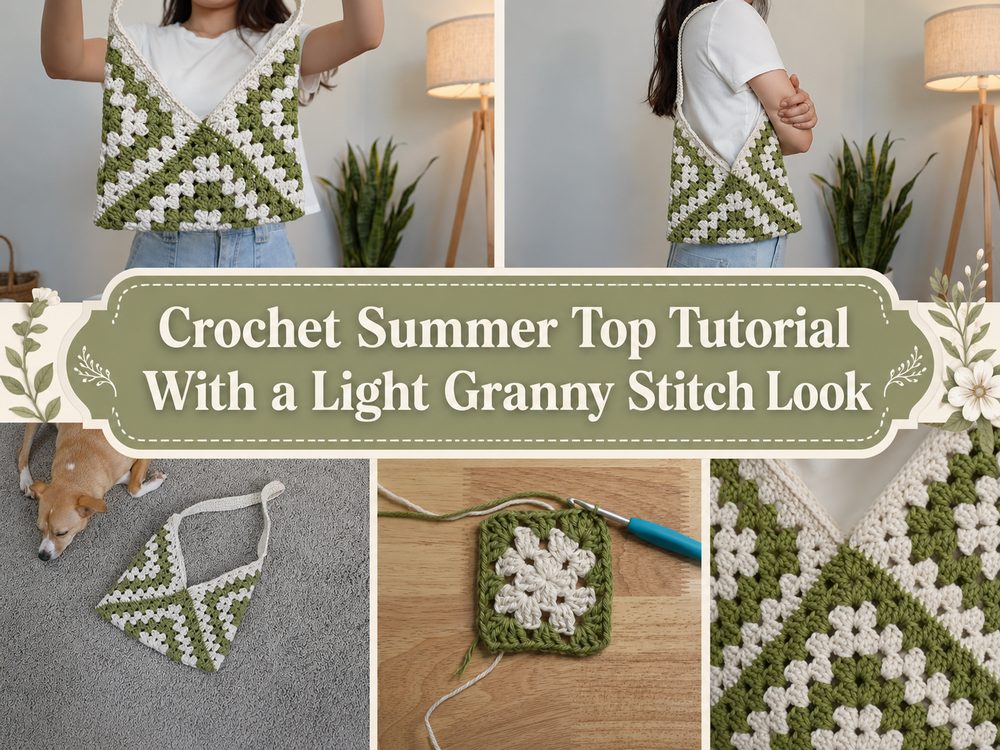
A granny square bag is one of those fun crochet projects that feels both classic and fresh at the same time. This one creates a simple shoulder bag with three granny squares so it’s a good choice when you want something useful, cute and easy to customise.

Why You’ll Love This Project
This bag is a great way to take a basic granny square and make something you can actually use. Depending on the look you want, you can make it bigger or smaller, relaxed, beginner-friendly.
Items You’ll Need
- Thread
- Crochet hook Scissors
- Needle for yarn
- Stitch markers
Choose any yarn and hook size that gives you the fit and texture you want.
Best Yarn to Use for the Project
Cotton or a strong cotton blend is really good for a bag, helps the shape hold well. If you prefer a softer slouchy look you can use acrylic or any other easy care yarn.
Skill Level:
Simple for beginners.
Size & Fit Guide
You can make the granny squares smaller for a smaller purse or keep adding rounds for a roomier shoulder bag. Adjust the length of the strap as needed to sit where you want it:
Stitches Employed
This project uses simple granny square stitches: chain stitches, double crochet, and slip stitches for joining and finishing.
How to Make It
Build the base
First crochet your first Granny Square. Then make match two more squares.
Work the Main
When you have finished all three squares, assemble in the bag shape as in the tutorial and join the edges neatly.
Resize picture
To make a bigger bag, just add more rounds to each square. You can also adjust the strap so it feels good on your shoulder.
Join or Create
Fold and sew the attached squares into the final shape of your bag, making sure the corners line up nicely.
Edge Finishing
Attach the strap, neaten the top edge and weave in any loose ends for a smart finish. This tutorial shows you how to make a three granny square shoulder bag. It is designed to be made to any size.
Tips to Help
- Keep your tension even so that all three squares are equal.
- Join corners with stitch markers.
- Count your rounds carefully So that the squares are the same size.
- Weave in ends securely, especially on a bag that will be used a lot.
- Blocking out light will allow the squares to lay flatter before joining.
Mistakes to Make
- Creating a square larger than the rest
- Bag with extremely loose tension
- Twisting and connecting the strap
- Skip corner checks before seaming
- Not tying off yarn ends properly
Personalise Your Idea
You can play with colour changes in each round, add a contrasting border, make the strap longer or add a lining for more structure. Another cute finishing touch can be a button closure, bow or little tassel.
Ideas of Style
This bag is lovely with casual everyday outfits, summer dresses, or market day basics. It also makes a beautiful handmade gift.
Maintenance Notes
Wash gently in cool water, reshape when damp and lay flat to dry. Steam lightly if needed or block it back into shape.
Time Required
This can take anywhere from a few hours depending on your speed, yarn, size and stitch pattern.
Final thoughts
If you love practical crochet projects with a handmade look then this granny square bag is such a satisfying one to make. It’s simple, pretty and so easy to make your own.
FAQs
Can I make this bag bigger?
Yes, just keep adding rounds to your granny squares until you reach the size you want.
Is this good for beginners?
Yes, it is a nice beginner project if you are comfortable with a basic granny square.
What yarn works best?
Cotton is a great choice for structure and everyday use.
Do I need a lining?
Not always, but a lining can help if you want the bag to feel sturdier or hold smaller items.
Can I change the strap length?
Yes, you can make it shorter or longer to suit your style.


