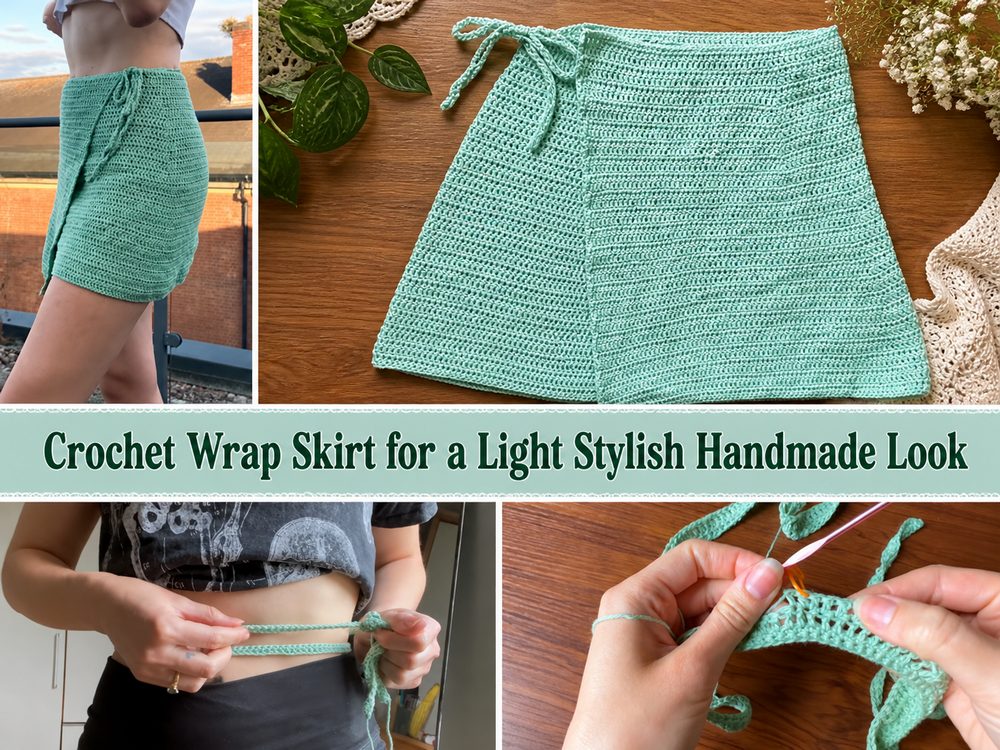
Crochet Wrap Skirt for a Light Stylish Handmade Look Full Pattern
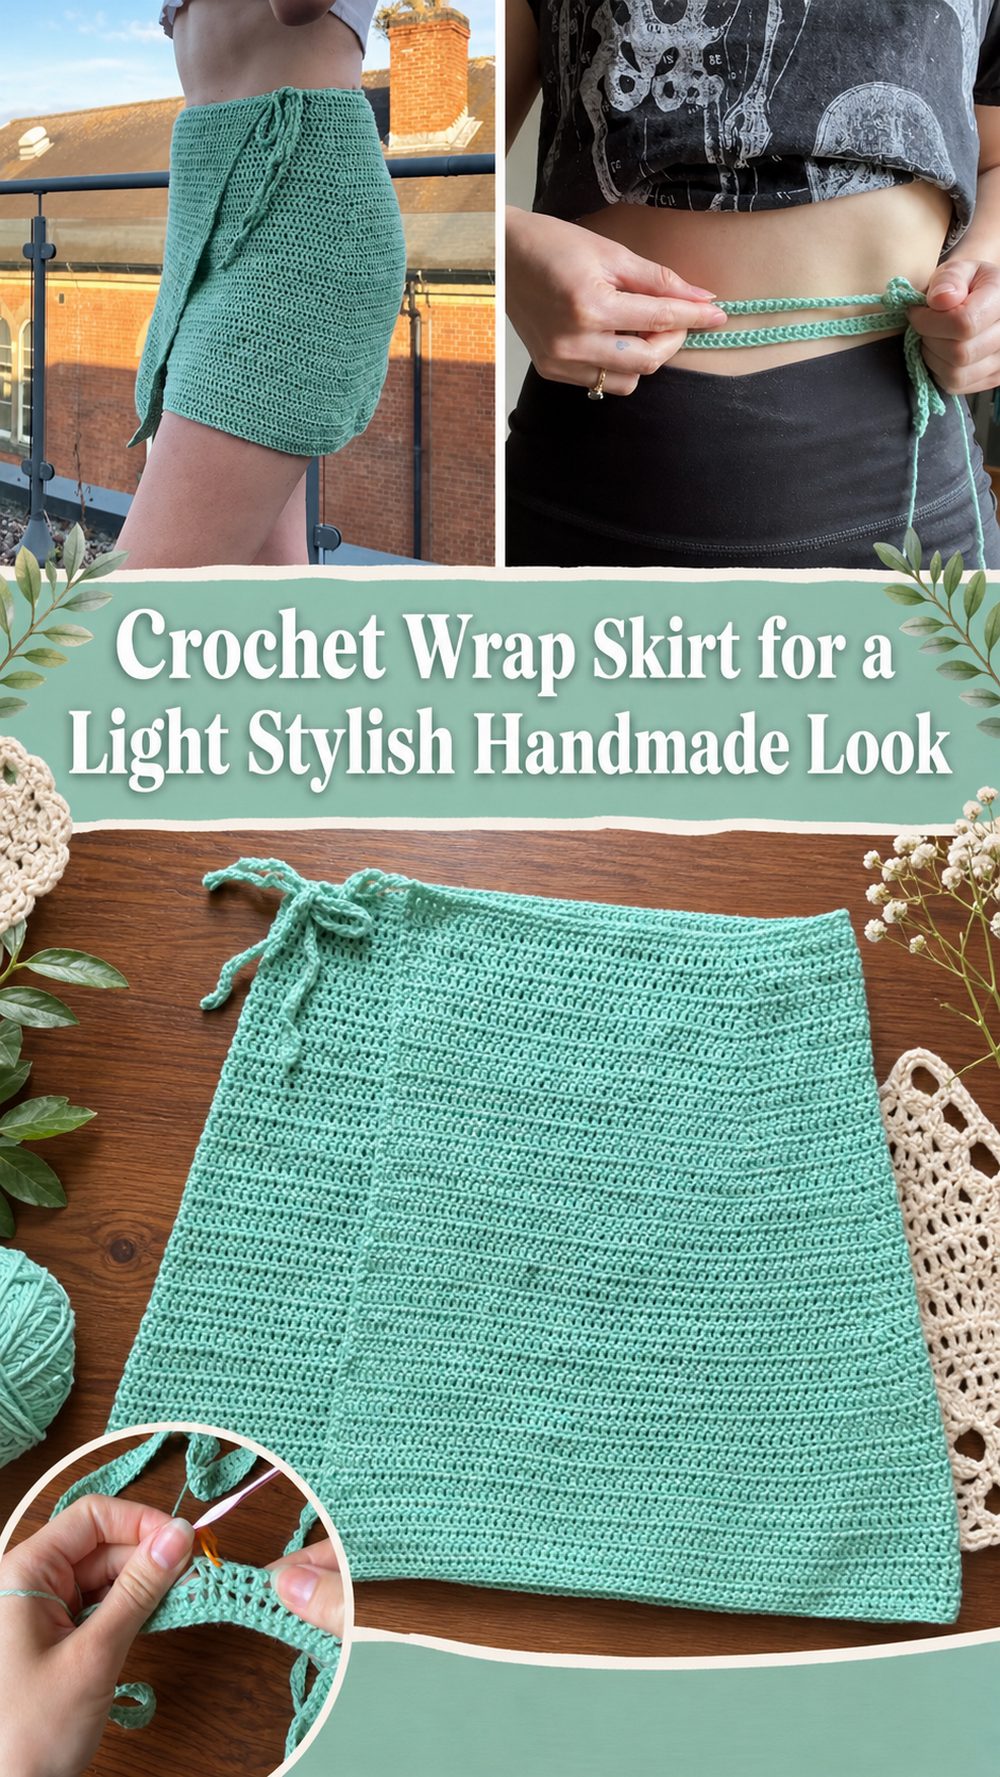
A crochet wrap skirt is such a good project when you want something handmade that feels stylish and actually wearable. It has that easy summer feel, but it also gives you more flexibility than a regular fitted skirt because the wrap style lets you adjust the fit more naturally around your body. For this one, I chose a YouTube tutorial that clearly presents the project as a crochet wrap skirt tutorial for beginners and describes it as very easy and beginner friendly, which makes it a great choice for anyone who wants a simple wearable piece without diving into a complicated garment pattern.
Why You’ll Love This Project
This wrap skirt is worth making because it feels light, practical, and easy to customize. The selected tutorial specifically describes the skirt as very easy and beginner friendly, which makes it especially appealing if you want a wearable crochet project that still feels approachable.
Materials Needed
- Yarn
- Crochet hook
- Scissors
- Yarn needle
- Stitch markers
- Measuring tape
- A tie or strap section made from crochet as part of the wrap design
Use a yarn and hook size that matches your desired fit and texture.
Best Yarn for This Project:
For a wrap skirt, breathable yarn is usually the nicest choice. Cotton works especially well because it helps the skirt keep its shape while still feeling comfortable for warm weather. A bamboo blend or other soft plant-based yarn can also be lovely if you want a little more drape. Since this is a wrap-style garment, lighter yarn usually helps the skirt sit more comfortably and move more naturally.
Skill Level:
This project is beginner-friendly. The selected YouTube video explicitly describes the wrap skirt as very easy and beginner friendly, so it looks well suited to newer crocheters who are ready to try a simple garment project.
Size and Fit Guide:
A wrap skirt is naturally easier to adjust than many other skirts because the overlap and tie closure give you a bit more freedom with fit. As you work, measure around the area where you want the skirt to sit, then keep checking the width and overlap before finishing. You can continue until it wraps comfortably around your body and sits the way you like.
Stitches Used:
The search result does not list every stitch used in the tutorial, so it is best to follow the video directly for the exact stitch pattern. What is clear is that the project is taught as an easy beginner wrap skirt, so the construction is intended to be simple and approachable rather than overly technical.
How to Make It
Step 1: Start with Your Measurements
A wrap skirt works best when you begin by thinking about fit before anything else. Decide where you want the skirt to sit on your waist or hips, then measure that area so you know how much width you need. Because this is a wrap design, you also want a little extra fabric for overlap, not just the exact body measurement.
This is one of the nicest things about a wrap skirt. It does not have to fit in a super rigid way. You can give yourself a little more coverage, a little less, or a slightly deeper overlap depending on how you want it to look and feel.
Step 2: Make the Waist Section
The top edge of the skirt is what helps everything sit properly, so this is the part to work carefully. Keep your tension even and think about comfort. A wrap skirt should feel secure, but it should not dig in or feel stiff.
If the tutorial uses a simple straight waistband area, that is ideal for beginners because it keeps the upper section neat and easy to manage. As the first part grows, hold it around yourself now and then to see whether the fit feels right before you move too far ahead.
Step 3: Build the Main Skirt Panel
Once the top section is established, the skirt body starts to grow into the actual wrap shape. This is where the project becomes really satisfying, because you begin to see the drape and style of the garment. A wrap skirt usually looks best when the body feels light enough to move well and soft enough to sit comfortably over the body.
As you continue, keep checking the width and the shape of the panel. Since it is a wrap skirt, one side will eventually overlap the other, so the body should feel generous enough for that style without becoming bulky. If you want more coverage, continue the panel a little wider. If you want a lighter beachier look, keep it a bit simpler and more relaxed.
Step 4: Shape the Wrap Look
This is the stage where the skirt starts looking clearly like a wrap design instead of a flat crochet panel. The front overlap is what gives the finished piece its style, so take your time here and think about how you want it to sit when worn.
A wrap skirt can be very flattering because it lets you adjust the angle and closure to suit your body. As you work, hold the piece around yourself and check how the front overlap looks. That way, you can decide whether you want the wrap section a little deeper, a little shorter, or slightly more open.
Step 5: Add the Tie or Closure Section
One of the most useful parts of a wrap skirt is the closure. Instead of relying only on a fixed waistband, the tie helps the skirt stay in place and gives you more control over the fit. Keep this section neat and strong enough for regular wear.
If the tie is crocheted as part of the project, make sure it feels long enough to wrap and fasten comfortably. You do not want to finish the skirt and realize the tie is too short to feel secure. This is one of those small details that makes a big difference in how wearable the finished skirt feels.
Step 6: Adjust the Length
The length is one of the easiest parts to personalize. You can keep your wrap skirt shorter for a light summer look, make it a little longer for everyday styling, or extend it further for a more relaxed boho feel.
As you build the skirt body downward, stop every so often and check how the length will look when worn. Handmade skirts usually turn out best when you judge them by how they actually hang rather than by trying to chase a strict number of rows.
Step 7: Finish the Edges Neatly
Once the skirt reaches your preferred size and shape, finish the edges carefully. A neat edge makes the whole garment look more polished, especially around the wrap front and hemline. Weave in all ends securely so the skirt feels tidy and wearable.
When finished, the skirt should look light, handmade, and easy to style, with a wrap shape that feels comfortable and flattering.
Helpful Tips
- Use breathable yarn for a lighter summer feel.
- Measure before starting so the wrap has enough overlap.
- Check the fit often as you build the skirt panel.
- Keep the tie section long enough to fasten comfortably.
- Try the skirt against your body while working if possible.
- Finish the front edges neatly so the wrap shape looks clean.
Common Mistakes to Avoid
- Making the skirt too narrow to wrap properly.
- Forgetting to allow extra width for the overlap.
- Using yarn that feels too heavy or stiff.
- Making the tie too short.
- Ignoring the drape of the fabric as the skirt grows.
- Leaving the edges untidy, especially at the front wrap section.
Customization Ideas
A crochet wrap skirt is very easy to personalize. You can make it in a neutral shade for a simple beachy look, choose bright summer colors for something more playful, or use a soft earthy tone for a relaxed handmade style. You can also make it shorter, longer, more fitted, or more breezy depending on how you want to wear it. A simple wrap shape already looks stylish, so even small changes in color and length can completely change the feel of the finished skirt.
Style Ideas
This kind of skirt looks lovely with a fitted tank, crochet top, bikini top, or simple tucked-in tee. It works well as a beach cover-up, a holiday outfit piece, or a casual summer skirt for everyday wear. Pair it with sandals, a tote, and light jewelry for an easy warm-weather look.
Care Instructions
Hand wash gently or use a delicate cycle if your yarn allows it. Lay the skirt flat to dry so the shape stays neat, especially around the wrap front and waistband. Avoid high heat so the fabric keeps its drape and finish.
Time Needed
This may take a few hours to a couple of days depending on your speed, yarn choice, skirt length, and stitch pattern.
Conclusion
A crochet wrap skirt is such a satisfying project because it gives you a stylish handmade garment that is also flexible and wearable. The selected YouTube tutorial stands out because it clearly presents the project as a very easy and beginner friendly wrap skirt, which makes it a strong choice for crocheters who want to try a simple clothing project with a flattering result.
FAQs
Is this beginner-friendly?
Yes. The selected tutorial specifically describes the wrap skirt as very easy and beginner friendly.
Can I adjust the size?
Yes. A wrap skirt is naturally flexible, and you can adjust the width, overlap, and length as you crochet.
What yarn is best for a crochet wrap skirt?
Lightweight cotton or another breathable yarn is usually the best choice for a comfortable, wearable result.
Can I make it for summer?
Yes. A wrap skirt is especially nice for warm weather, especially when made with breathable yarn and a light fabric.
Do wrap skirts fit more easily than regular crochet skirts?
Often yes. The wrap design gives you more flexibility because the overlap and tie closure help you adjust the fit more naturally.